- File Specs & Errors
AI Nail Virtual Try-On
The AI Nail Virtual Try On API offers an innovative way to enhance the online experience for customers interested in nail art. It allows shoppers to visualize a variety of nail styles virtually, from artificial and acrylic nails to press-on options and gel designs. With unlimited color and texture options, users can effortlessly explore different looks on both natural and synthetic nails. The platform enables personalized try-ons, letting individuals switch between styles and see before-and-after comparisons easily. This seamless integration streamlines product discovery and increases customer confidence by providing accurate, interactive previews before purchasing.
This guide walks you through:
Workflow for AI Nail Virtual Try On API:
Authentication Required: Authorization: Bearer YOUR_API_KEY
Workflow Steps:
Image Upload Preparation:
- The process begins with preparing a back of the hand image.
- Call the File API
/s2s/v2.0/fileto obtain the upload URL and associatedfile_id. - Upload the back of the hand with nail image using the provided upload URL.
Nail Design Setup Options:
- Begin by selecting a suitable nail color. You can also choose a custom shape according to your taste.
Initiate AI Task and Obtain Task ID:
- Send the uploaded image(s) along with the chosen effect configuration via an HTTP POST request to
/s2s/v2.0/task/nail-vto. - Await a unique task ID in the response, which identifies this interaction.
- Send the uploaded image(s) along with the chosen effect configuration via an HTTP POST request to
Poll Task Status (Continuous Check):
- Use the obtained
task_idto periodically poll the task status using an HTTP GET request (e.g.,GET /s2s/v2.0/task/nail-vto/${task_id}). - Continuously monitor for:
Task_status = "success"(process completed).Task_status = "error"(resolve or retry if applicable).
- Update the workflow accordingly once the status transitions to success.
- Use the obtained
This structured workflow ensures efficient integration with user inputs, automated monitoring of tasks, and seamless retrieval of results.
- API Playground
Interactively explore and test the API using our official playground:
- Authentication
- Include your API key in the request header using Bearer Token:
Authorization: Bearer YOUR_API_KEY
You can find your API Key at https://yce.makeupar.com/api-console/en/api-keys/.
Upload an Image
You may upload a file directly to the server or provide a valid image URL in the VTO task payload.
Upload Endpoint
POST /s2s/v2.0/file
Alternatively, skip this step if you already have a public image URL.
Prepare an effect template
There are four distinct setup modes available for this purpose:
- Customizing the color and aligning it with your current nail look
- Utilizing a preset design and a specific shape to create your vision
- Adding pressed-on nails and linking them with your existing original nail image
- Providing image links for pressing-on nail products that match
Effect Template JSON Schemas
{
    "version": "1.0",
    "effect_type": "nail_polish", // valid values: ['nail_polish', 'press_on_nails']
    "effects": [],
    "ref_file_ids": []
}
Effect Format
- Nail Polish - Color
{ "sub_type": "color", "finger": "index", // valid values: ['thumb', 'index', 'middle', 'ring', 'pinky'] "color": "#ff0000", "texture": "cream", // valid values: ['matte', 'cream', 'metallic', 'jelly', 'sheer', 'pearl', 'textured', 'shimmer_coarse', 'shimmer_fine'] "transparency": 0, // 0-100, for textures except metallic "reflection": 0, // 0-100 "contrast": 0, // 0-100 "roughness": 0, // 0-100 "shimmer_opacity": 0, // 0-100, for texture pearl "shimmer_size": 0, // 0-100, for texture shimmer_coarse and shimmer_fine "textured_size": 0, // 0-100, for texture textured }- Nail Polish - Design
{ "sub_type": "design", "finger": "index", // valid values: ['thumb', 'index', 'middle', 'ring', 'pinky'] "ref_file_url": "", // Optional; Either ref_file_id or ref_file_url must be filled, but only one can be selected. "ref_file_index": 0, // This field is optional unless uploading is selected. Index corresponding to ref_file_ids under the root node "texture": "cream", // valid values: ['matte', 'cream', 'metallic', 'jelly', 'sheer', 'pearl', 'textured', 'shimmer_coarse', 'shimmer_fine'] "transparency": 0, // 0-100, only for textures except metallic "reflection": 0, // 0-100 "contrast": 0, // 0-100 "roughness": 0, // 0-100 "shimmer_opacity": 0, // 0-100, for texture pearl "shimmer_size": 0, // 0-100, for texture shimmer_coarse and shimmer_fine "textured_size": 0, // 0-100, for texture textured }- Press On Nails - Color
- You can find the latest shape values at: https://plugins-media.makeupar.com/wcm-saas/shapes/nails.json
{ "sub_type": "color", "finger": "index", // valid values: ['thumb', 'index', 'middle', 'ring', 'pinky'] "shape": "square_oval", // Please check the nails.json. valid values: ['square_oval','square_square','square_squoval','squoval_oval','squoval_square','squoval_squoval','oval_oval','oval_square','oval_squoval','almond_oval','almond_square','almond_squoval','stiletto_oval','stiletto_square','stiletto_squoval], "length": 1.0, // 0.8-2.15, for shapes except original "color": "#ff0000", "texture": "cream", // valid values for other shapes: ['matte', 'cream', 'metallic'] "reflection": 0, // 0-100 "contrast": 0, // 0-100 "roughness": 0 // 0-100 }- Press on Nails - Design
{
    "sub_type": "design",
    "finger": "index", // valid values: ['thumb', 'index', 'middle', 'ring', 'pinky']
    "ref_file_url": "",  // Optional; Either ref_file_id or ref_file_url must be filled, but only one can be selected.
    "ref_file_index": 0, // This field is optional unless uploading is selected. Index corresponding to ref_file_ids under the root node
    "texture": "cream", // valid values: ['matte', 'cream', 'metallic']
    "reflection": 0, // 0-100
    "contrast": 0, // 0-100
    "roughness": 0, // 0-100
}
Effect Template Design Logic
- Detect effect type (
press_on_nailsvsnail_polish). - Iterate over each entry in
effects:
If
sub_type === "color"→ map fields directly, fill missing texture‑related keys with defaults. Ifsub_type === "design"→- If the user gave a
ref_file_url, keep it and omitref_file_index. - If the user supplied an index (
ref_file_index), ensureref_file_idsexists and the index is valid; then set"ref_file_id": ref_file_ids[index](optional – some back‑ends expect the raw index, not id).
- Normalize numeric ranges – clamp any out‑of‑range values to 0‑100 or length limits.
- Add missing optional keys with defaults so the schema validator passes.
- Serialize the final object as JSON (compact or pretty for debugging).
- Detect effect type (
Example Payload (ready to send)
{
"version": "1.0",
"src_file_url": "https://plugins-media.makeupar.com/strapi/assets/nail_user_photo_01_27d4260646.jpg",
"effect_type": "press_on_nails",
"ref_file_ids": [
    "Ks3kh+1nPpVNm8iJb5374CWtBzkT4B44NPJwXbBKqVxfjK3xgCQ+hRt9MJXBFaud",
    "+Z7PSjuzigvsc3S/Yli1A4WN7c3J6NJHFqK2iUlqD2BfjK3xgCQ+hRt9MJXBFaud"
],
"effects": [
    {
    "sub_type": "design",
    "finger": "thumb",
    "texture": "cream",
    "reflection": 100,
    "contrast": 50,
    "roughness": 0,
    "ref_file_index": 0
    },
    {
    "sub_type": "design",
    "finger": "index",
    "texture": "cream",
    "reflection": 100,
    "contrast": 50,
    "roughness": 0,
    "ref_file_index": 1
    },
    {
    "sub_type": "design",
    "finger": "middle",
    "texture": "cream",
    "reflection": 100,
    "contrast": 50,
    "roughness": 0,
    "ref_file_url": "https://plugins-media.makeupar.com/strapi/assets/press_on_nail_06_3_9ce2ddc47a.png"
    },
    {
    "sub_type": "design",
    "finger": "pinky",
    "texture": "cream",
    "reflection": 100,
    "contrast": 50,
    "roughness": 0,
    "ref_file_url": "https://plugins-media.makeupar.com/strapi/assets/press_on_nail_06_5_f6e46dd56f.png"
    },
    {
    "sub_type": "design",
    "finger": "ring",
    "texture": "cream",
    "reflection": 100,
    "contrast": 50,
    "roughness": 0,
    "ref_file_url": "https://plugins-media.makeupar.com/strapi/assets/press_on_nail_06_4_2103ca8cac.png"
    }
]
}
Create a Nail VTO Task and Poll for Results
Once you have an image and a complete effect payload, create a task. The API processes the request asynchronously. You must poll the task status until it reaches
successorerror.Create Task Endpoint
POST /s2s/v2.0/task/nail-vtoPolling Endpoint
GET /s2s/v2.0/task/nail-vto/{task_id}
- AI Nail Virtual Try-On Specification
Supported Nail View A single nail image in a clear front view without obstruction.
| Item | Supported Dimensions | Supported File Size | Supported Formats |
|---|---|---|---|
| Nail Design Image - Nail Polish | * 271 px ≤ Width ≤ 542 px * 522 px ≤ Height ≤ 1044 px * At least 72ppi The image will be applied from the center, and the virtual try-on effect will vary according to the length of user’s fingernails. | ≤ 1MB | png |
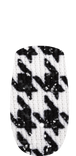
| Nail Design Image - Press-On Nail | * 271 px ≤ Width ≤ 542 px * 522 px ≤ Height ≤ 1044 px * 0.5 ≤ Image aspect ratio (H/W) ≤ 3.5 * At least 72ppi The image’s content, shape, and length settings are all used to generate the virtual try-on effect. Since the user’s fingernail width is detected to ensure proper image scaling, it is recommended to create separate images for each fingernail with the correct aspect ratio. Please download a press-on nail design image sample, and refer to the image guidelines for further details. Download: Nail_Design_Image_Guidelines.pdf | ≤ 1MB | png (with transparent background) |
Press-on nail design image sample:

Supported Hand View
| Item | Supported Dimensions | Supported File Size | Supported Formats |
|---|---|---|---|
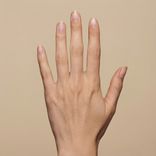
| User Photo | * Long side ≤ 2048 * Short side ≥ 256 | ≤ 10MB | jpg/jpeg/png |
- Support only one hand in the input image
- The area of hand palm is better to be at least half of that of input image
- The aspect ratio of the input image is better to be 1:1, 3:4, 4:3
- The nails of fingers should not be occluded
- It is better that there is no nail tip and nail polish on the nail
- Error Codes
| Error Code | Description |
|---|---|
| error_nail_too_small | The nail regions are too small. |
| error_no_nail | No nails were detected in the source image. |
- Environment & Dependency
| Sample Code Language / Tool | Recommended Runtime Versions |
|---|---|
| cURL | - bash >= 3.2 - curl >= 7.58 (modern TLS/HTTP support) - jq >= 1.6 (robust JSON parsing) |
| Node.js (JavaScript) | Node >= 18 (for global fetch) |
| JavaScript | - Chrome / Edge >= 80 - Firefox >= 74 - Safari >= 13.1 |
| PHP | PHP >= 7.4 (for modern TLS/compat), ext-curl (recommended) or allow_url_fopen=On + ext-openssl, ext-json |
| Python | Python >= 3.10 (for f-strings), requests >= 2.20.0 |
| Java | Java 11+ (for HttpClient), Jackson Databind >= 2.12.0 |
version: v2.5The JavaScript Camera Kit provides a complete in-browser camera solution designed for high-accuracy face-based imaging tasks. It handles camera permissions, real-time face detection, automatic quality validation (lighting, pose, angle, distance), and guided capture UI flows.
This module is optimized for AI-driven image analysis, such as:
- AI Skin Analysis (SD/HD)
- AI Face Tone Analysis
- Hair-related Analysis
- Virtual Try-On (Ring, Wrist, Necklace, etc.)
- Permission Handling: Automatic management of webcam access.
- Quality Validation: Real-time monitoring of face position, lighting, and angle.
- Multi-Step Flows: Support for complex capture requirements (e.g., multi-angle hair capture).
- Flexible Output: Supports both
base64andblobimage formats.
Include the SDK via CDN in your HTML <head> or before the closing <body> tag. Once loaded, the SDK installs a global YMK object.
<script src="https://plugins-media.makeupar.com/v2.5-camera-kit/sdk.js"></script>The following example demonstrates how to initialize the kit, open the camera, and handle captured images.
<!DOCTYPE html>
<html lang="en">
  <head>
    <meta charset="UTF-8" />
    <meta name="viewport" content="width=device-width, initial-scale=1.0" />
    <title>Camera Kit Sample</title>
    <style>
      #YMK-module { margin: 20px 0; }
      img { width: 150px; margin: 5px; border: 1px solid #ccc; }
    </style>
  </head>
  <body>

    <!-- Initialization Script -->
    <script>
      // Define async init entry point
      window.YMKAsyncInit = function() {
        YMK.addEventListener('loaded', function() {
          console.log('Module fully loaded and ready');
        });

        YMK.addEventListener('faceDetectionCaptured', function(capturedResult) {
          const container = document.getElementById('captured-results');
          container.innerHTML = '';

          // Handle multiple images if returned (e.g., multi-angle capture)
          for (const item of capturedResult.images) {
            const img = document.createElement('img');
            // Handle both base64 strings and Blob objects
            img.src = typeof item.image === 'string'
              ? item.image
              : URL.createObjectURL(item.image);
            container.appendChild(img);
          }
        });
      };

      function openCameraKit() {
        YMK.init({
          faceDetectionMode: 'makeup',
          imageFormat: 'base64',
          language: 'enu'
        });
        YMK.openCameraKit();
      }
    </script>

    <!-- Load SDK -->
    <script src="https://plugins-media.makeupar.com/v2.5-camera-kit/sdk.js"></script>

    <!-- UI Elements -->
    <button onclick="openCameraKit()">Open Camera Kit</button>

    <!-- Mandatory Mount Point -->
    <div id="YMK-module"></div>

    <h3>Captured Results:</h3>
    <div id="captured-results"></div>
  </body>
</html>To ensure successful integration, the following requirements must be met:
| Requirement | Description |
|---|---|
| Browser Support | Must support getUserMedia API. |
| HTTPS | Required on most browsers for webcam access (except localhost). |
| Mount Point | A <div id="YMK-module"></div> is mandatory for rendering the UI. |
| Async Init | You must define window.YMKAsyncInit before the SDK loads. |
Call YMK.init() before calling YMK.openCameraKit().
YMK.init({
  faceDetectionMode: 'makeup', // Detection flow
  imageFormat: 'base64',       // Output format
  language: 'enu'              // UI Language
});Register listeners for camera events and capture results.
YMK.addEventListener('faceQualityChanged', function(q) {
  console.log('Quality updated:', q);
});This displays the UI, opens the webcam, and begins real-time monitoring.
YMK.openCameraKit();Images arrive via the faceDetectionCaptured event.
YMK.addEventListener('faceDetectionCaptured', function(result) {
  console.log(result.images);
});Clean up resources when done.
YMK.close();Configures module appearance, detection mode, language, and capture format.
| Argument | Type | Description | Default |
|---|---|---|---|
faceDetectionMode | string | Detection flow to use (see Detection Modes below). | "skincare" |
width | number | Pixel width of module container (300–1920). | 360 (≥500px) or screen width |
height | number | Pixel height of module container (300–1920). | 480 (≥500px) or min(screen.height, innerHeight) |
language | string | UI Language code (chs, cht, deu, enu, esp, fra, jpn, kor, ptb, ita, mon ). | "enu" |
imageFormat | string | Format returned via faceDetectionCaptured. | "base64" |
disableCameraResolutionCheck | boolean | Allow running even if webcam does not meet required resolution. | false |
hideFlipCameraButton | boolean | Controls visibility of the flip front/back camera button if the device supports it. | false |
countingDuration | number | Controls the countdown milliseconds when camera quality check meets criteria before auto-capture. | 800 |
qualityLevel | string | Controls the camera quality check setting, with options of relaxed, moderate, or strict. | relaxed |
qualityOverrides | object | Configure detailed parameters for camera quality verification. | See Camera Kit Quality Configuration |
videoQuality | string | Configure the output quality to 720p, 1080p, or 1920p. 720p corresponds to 1280 × 720, 1080p to 1920 × 1080, and 1920p to 2560 × 1920. This setting is supported only for skincare and hdskincare | 720p |
| Method | Description |
|---|---|
YMK.openCameraKit() | Opens the module and begins detection. |
YMK.close() | Closes module and camera. |
YMK.addEventListener(event, callback) | Registers event callbacks. Returns an EventListenerIdentifier. |
YMK.removeEventListener(id) | Removes listener by identifier. |
YMK.isLoaded() | Returns whether livestream or photo is drawn on canvas (boolean). |
YMK.pause() | Pauses the webcam stream. |
YMK.resume(restartWebcam) | Resumes webcam after pause. |
YMK.getInfo() | Returns current module info (e.g., { fps: 30 }). |
Camera Kit provides configurable quality parameters to control face detection and skin analysis behavior. These parameters allow developers to fine-tune detection strictness while maintaining consistency across web and native SDK implementations.
To simplify configuration, Camera Kit includes three predefined presets:
- RELAXED: Optimized for usability with minimal restrictions
- MODERATE: Balanced between usability and accuracy
- STRICT: Optimized for maximum detection accuracy
All custom configurations must meet or exceed the minimum requirements defined by the RELAXED preset.
Camera Kit Quality Configuration supports both skincare and hdskincare.
| Preset | Description |
|---|---|
| RELAXED | Less strict validation for smoother user experience |
| MODERATE | Balanced validation for most use cases |
| STRICT | Tight validation for high accuracy scenarios |
When using qualityOverrides, you may specify only the parameters you want to change. Unspecified parameters fall back to the active preset defaults.
{
  "face_ratio_lower_threshold": 0.55,
  "face_ratio_upper_threshold": 1,
  "face_left_boundary_lower_threshold": 0,
  "face_left_boundary_upper_threshold": 1,
  "face_right_boundary_lower_threshold": 0,
  "face_right_boundary_upper_threshold": 1,
  "face_top_boundary_lower_threshold": 0,
  "face_top_boundary_upper_threshold": 1,
  "face_bottom_boundary_lower_threshold": 0,
  "face_bottom_boundary_upper_threshold": 1,
  "pitch_lower_threshold": -20,
  "pitch_upper_threshold": 10,
  "yaw_lower_threshold": -15,
  "yaw_upper_threshold": 15,
  "roll_lower_threshold": -15,
  "roll_upper_threshold": 15,
  "lighting_lower_threshold": 0.55,
  "lighting_upper_threshold": 0.8,
  "lighting_uneven_threshold": 0.2
}Controls the acceptable proportion of the detected face.
- Measurement basis:
- Landscape mode: vertical ratio
- Portrait mode: horizontal ratio
| Parameter | Description | Allowed Range | Preset Defaults |
|---|---|---|---|
face_ratio_lower_threshold | Minimum face ratio | 0.55 to 1.0 | STRICT 0.75, MODERATE 0.65, RELAXED 0.55 |
face_ratio_upper_threshold | Maximum face ratio | 1.0 | 1.0 (all presets) |
Defines how close the face can be to the frame edges.
| Parameter | Description | Allowed Range | Default |
|---|---|---|---|
face_left_boundary_lower_threshold | Left boundary minimum | 0.0 to 1.0 | 0.0 |
face_left_boundary_upper_threshold | Left boundary maximum | 0.0 to 1.0 | 1.0 |
face_right_boundary_lower_threshold | Right boundary minimum | 0.0 to 1.0 | 0.0 |
face_right_boundary_upper_threshold | Right boundary maximum | 0.0 to 1.0 | 1.0 |
face_top_boundary_lower_threshold | Top boundary minimum | 0.0 to 1.0 | 0.0 |
face_top_boundary_upper_threshold | Top boundary maximum | 0.0 to 1.0 | 1.0 |
face_bottom_boundary_lower_threshold | Bottom boundary minimum | 0.0 to 1.0 | 0.0 |
face_bottom_boundary_upper_threshold | Bottom boundary maximum | 0.0 to 1.0 | 1.0 |
Controls allowable head orientation.
| Parameter | Description | Allowed Range | Preset Defaults |
|---|---|---|---|
pitch_lower_threshold | Minimum pitch angle | -20 to 10 | STRICT -10, MODERATE -15, RELAXED -20 |
pitch_upper_threshold | Maximum pitch angle | -20 to 10 | STRICT 0, MODERATE 5, RELAXED 10 |
yaw_lower_threshold | Minimum yaw angle | -15 to 15 | STRICT -5, MODERATE -10, RELAXED -15 |
yaw_upper_threshold | Maximum yaw angle | -15 to 15 | STRICT 5, MODERATE 10, RELAXED 15 |
roll_lower_threshold | Minimum roll angle | -15 to 15 | STRICT -5, MODERATE -10, RELAXED -15 |
roll_upper_threshold | Maximum roll angle | -15 to 15 | STRICT 5, MODERATE 10, RELAXED 15 |
Defines acceptable lighting quality and uniformity.
| Parameter | Description | Allowed Range | Preset Defaults |
|---|---|---|---|
lighting_lower_threshold | Minimum lighting level | 0.55 to 1.0 | STRICT 0.8, MODERATE 0.7, RELAXED 0.55 |
lighting_upper_threshold | Maximum lighting level | 0.8 to 1.0 | STRICT 0.9, MODERATE 0.85, RELAXED 0.8 |
lighting_uneven_threshold | Maximum luma difference between eyes | 0.0 to 0.2 | STRICT 0.1, MODERATE 0.15, RELAXED 0.2 |
- Custom values must not be less restrictive than RELAXED preset values.
- Only specified fields in
qualityOverridesare applied. - All unspecified parameters default to the selected preset.
Configure the faceDetectionMode in YMK.init() to suit your specific use case.
| Mode | Description |
|---|---|
makeup | Standard camera mode for virtual cosmetic try-on. |
skincare | Standard skin analysis mode, close-up face capture. Support AI Skin Analysis and AI Skin Simulation. |
hdskincare | High-definition capture for AI skin analysis using webcams with a minimum resolution of 2560 pixels on the longer side, subject to device support. |
shadefinder | Skin Tone Analysis front-face capture. |
facereshape | AI Face Reshape capture and AI Face Lift. |
hairlength | Full hair-length capture (from a distance). |
hairfrizziness | 3-phase capture: front, right-turn, left-turn. |
hairtype | Same 3-phase multi-angle capture flow. |
hairdensity | A 45‑degree downward head‑angle photograph. |
ring | Hand capture for ring virtual try‑on. |
wrist | Wrist capture for watch or bracelet virtual try‑on. |
necklace | Selfie capture for necklace try-on. |
earring | Selfie capture for earring virtual try-on. |
teethwhiten | Front‑facing selfie that detects whether teeth are visible; photo taken only when detected. |
nail | Hand capture for nails virtual try‑on. |
comprehensive | Photo to be used simultaneously for AI Makeup, AI Skin Analysis, and AI Facial Attributes & Ratio Analysis. |
| Event | Description |
|---|---|
opened | Module opened. |
loading | Loading progress (0–100). |
loaded | Camera stream loaded onto canvas. |
closed | Module closed. |
faceDetectionStarted | User enters the detection UI. |
| Event | Description |
|---|---|
cameraOpened | Webcam opened successfully. |
cameraClosed | Webcam closed. |
cameraFailed | Permission denied or no webcam found. Error codes include "error_resolution_unsupported", "error_permission_denied", "error_access_failed". |
unsupportedResolution | Fired when the device resolution does not meet the minimum requirements for the selected mode. |
Fires continuously during detection as quality metrics update.
Example Payload:
{
  "hasFace": true,
  "position": "good",
  "frontal": "good",
  "lighting": "ok"
}
Field Definitions:
hasFace: (boolean) Whether a face is detected.position: (string) Face distance/size quality ("good","notgood","toosmall","outofboundary").frontal: (string) Whether user is facing forward ("good","notgood").lighting: (string) Lighting strength ("good","ok","notgood").
Fired after all required face quality validation checks have passed and the Camera Kit has successfully completed the capture workflow. Depending on the mode, this may contain one or multiple images.
Example Payload:
{
  "mode": "makeup",
  "images": [
    {
      "phase": 0,
      "image": "data:image/jpeg;base64,...",
      "width": 500,
      "height": 500
    }
  ]
}
Image Object Fields:
phase: (integer) Zero-based index representing the capture step.image: (string|Blob) The captured image data.width: (integer) Pixel width of the captured image.height: (integer) Pixel height of the captured image.
To ensure successful capture:
- Distance: Ensure correct face distance (not too zoomed in/out).
- Angle: Ensure frontal face angle.
- Lighting: Provide sufficient lighting (avoid shadows or dark environments).
Modes like hairtype or hairfrizziness require multiple steps:
- Front face
- Turn right
- Turn left
Ensure your event handling logic accounts for multiple images in the faceDetectionCaptured result array.
- Flip Button: Use
hideFlipCameraButton: trueto enforce a specific camera orientation if your UX requires it. - Capture Delay: Adjust
countingDuration(default800) to give users more time to review the capture before auto-submission occurs.
const minQuality = {
  hasFace: true,
  area: "good",
  frontal: "good",
  lighting: "ok"
};