AI Skin Analysis
 AI skincare analysis technology harnesses the power of artificial intelligence to analyze various aspects of the skin, from texture and pigmentation to hydration and pore size, with remarkable precision. Using advanced algorithms and machine learning, AI Skin Analysis can evaluate facial skin concerns from a single front facing selfie, providing accurate skin concern scores and detection masks to enable personalized product recommendations and skincare routines tailored to each individual's skin type and concerns.
This not only enhances the effectiveness of skincare products but also empowers users to make informed decisions about their skincare regimen. With the integration of AI skin analysis, individuals can now embark on a journey towards healthier, more radiant skin, guided by data-driven insights and the promise of more effective skincare solutions.
How to Take Photos for AI Skin Analysis
Take a selfie facing forward
- Just one clear shot, looking straight into the camera. Leave your hair down so it falls over your chest, and make sure you're staring directly ahead for that front-on view.
- Instead, use the JS Camera Kit to take a photo. Just leave your hair down so it falls over your chest. Don't tie it up.
Workflow Skin Analysis API Usage Guide This guide explains how to upload an image and create a skin analysis task using the File API and AI Task API.
Step 1: Resize your source image
Resize your photo to fit the supported dimensions - up to 4096 pixels on the long side and at least 480 pixels on the short side for SD, or up to 4096 pixels on the long side and at least 1080 pixels on the short side for HD. See details in File Specs & ErrorsStep 2: Upload File Metadata via File API
- Image Requirements
- See details in File Specs & Errors
Send a POST request to initialise the file upload:
curl --request POST \
  --url https://yce-api-01.makeupar.com/s2s/v2.0/file \
  --header 'Authorization: Bearer YOUR_API_KEY' \
  --header 'Content-Type: application/json' \
  --data '{
    "files": [
      {
        "content_type": "image/png",
        "file_name": "skin_analysis_01_3dbd1b6683.png",
        "file_size": 547541
      }
    ]
}'Important: Simply calling the File API does not upload your file. You must additionally upload the file to the URL provided in the File API response. That URL is your upload destination, make sure the file is successfully transferred there before proceeding.
Warning: Please note that, you will get an 500 Server Error / unknown_internal_error or 404 Not Found error when using AI APIs if you do not upload the file to the URL provided in the File API response.
- Step 3: Retrieve Upload URL and File ID
The response includes:
requests.url– Pre-signed URL for image upload.file_id– Identifier for creating an AI task.
Example Response:
{
  "status": 200,
  "data": {
    "files": [
      {
        "content_type": "image/png",
        "file_name": "skin_analysis_01_3dbd1b6683.png",
        "file_id": "SaGaqpDgKwFrVBgMpQMA3HY0LeqdT9/13W5TOD8/u/FfjK3xgCQ+hRt9MJXBFaud",
        "requests": [
          {
            "method": "PUT",
            "url": "https://yce-us.s3-accelerate.amazonaws.com/demo/ttl30/...signature...",
            "headers": {
              "Content-Length": "547541",
              "Content-Type": "image/png"
            }
          }
        ]
      }
    ]
  }
}- Step 4: Upload Image to Pre-signed URL
Use the provided requests.url and headers:
curl --location --request PUT 'https://yce-us.s3-accelerate.amazonaws.com/demo/ttl30/...signature...' \
  --header 'Content-Type: image/png' \
  --header 'Content-Length: 547541' \
--data-binary @'./skin_analysis_01_3dbd1b6683.png'- Step 5: Create AI Task
Use the file_id from Step 2 to create a skin analysis task:
curl --request POST \
  --url https://yce-api-01.makeupar.com/s2s/v2.0/task/skin-analysis \
  --header 'Authorization: Bearer YOUR_API_KEY' \
  --header 'Content-Type: application/json' \
  --data '{
    "src_file_id": "SaGaqpDgKwFrVBgMpQMA3HY0LeqdT9/13W5TOD8/u/FfjK3xgCQ+hRt9MJXBFaud",
    "dst_actions": ["wrinkle", "pore", "texture", "acne"],
    "miniserver_args": {
      "enable_mask_overlay": true,
      "enable_dark_background_hd_pore": true,
      "color_dark_background_hd_pore": "3D3D3D",
      "opacity_dark_background_hd_pore": 0.4
      // Additional parameters omitted for brevity
    },
    "format": "json"
  }'
Once the upload is complete, you can select any skin concerns to analyze using your file ID or image file url. Please refer to the Inputs & Outputs.
Subsequently, calling POST 'task/skin-analysis' with the File ID or image file url executes the enhance task and obtains a task_id. Please be advised that simultaneous use of SD and HD skin concern parameters is NOT supported.
- Use an Existing Public Image URL Instead of uploading, you may supply a publicly accessible image URL directly when initiating the AI task.
Example Response:
{
  "status": 200,
  "data": {
    "task_id": "SaGaqpDgKwFrVBgMpQMA3HY0LeqdT9_13W5TOD8_u_GPi6NqQ3dhlmN-6ntFwhzT"
  }
}- Step 6: Poll Task Status
Retrieve task results using the task_id:
curl --request GET \
  --url https://yce-api-01.makeupar.com/s2s/v2.0/task/skin-analysis/<YOUR_TASK_ID> \
  --header 'Authorization: Bearer YOUR_API_KEY' \
  --header 'Content-Type: application/json'
This task_id is used to monitor the task's status through polling GET 'task/skin-analysis' to retrieve the current engine status. Until the engine completes the task, the status will remain 'running', and no units will be consumed during this stage.
Processed results are retained for 24 hours after completion.- No need for short-interval polling.- Flexible polling intervals within the 24-hour window.
Important: Polling is still required to check task status, as execution time is not guaranteed.
The task will change to the 'success' status after the engine successfully processes your input file and generates the resulting image. You will get an url of the processed image and a dst_id that allow you to chain another AI task without re-upload the result image.
Your units will only be consumed in this case. If the engine fails to process the task, the task's status will change to 'error' and no unit will be consumed. When deducting units, the system will prioritize those nearing expiration. If the expiration date is the same, it will deduct the units obtained on the earliest date.
- Step 7: Interpret Results
The response includes:
ui_score– User-friendly score.raw_score– Raw analysis score.mask_urls– URLs for detection masks.
Example Response:
{
  "status": 200,
  "data": {
    "results": {
      "output": [
        {
          "type": "texture",
          "ui_score": 68,
          "raw_score": 57.33,
          "mask_urls": ["https://yce-us.s3-accelerate.amazonaws.com/...texture_output.jpg"]
        },
        {
          "type": "pore",
          "ui_score": 92,
          "raw_score": 95.34,
          "mask_urls": ["https://yce-us.s3-accelerate.amazonaws.com/...pore_output.jpg"]
        }
        // Additional results omitted for brevity
      ]
    },
    "task_status": "success"
  }
}- Debugging Guide
Warning: Please be advised that simultaneous use of SD and HD skin concern parameters is NOT supported. Attempting to deviate from these specifications will result in an InvalidParameters error.
- If you mix using HD and SD skin concerns, you will get an error as following:
{ "status": 400, "error": "cannot mix HD and SD dst_actions", "error_code": "InvalidParameters" } - If you misspell a skin concern or sending unknown skin concerns, you will get an error as following:
{
    "status": 400,
    "error": "Not available dst_action abc123",
    "error_code": "InvalidParameters"
}
- Real-world examples:


Input Paramenter Description There are two options for controlling the visual output of AI Skin Analysis results: either generate multiple images, with each skin concern displayed as an independent mask, or produce a single blended image using the
enable_mask_overlayparameter. By default, the system outputs multiple masks, giving you full control over how to blend each skin concern mask with the image.Default: enable_mask_overlay false
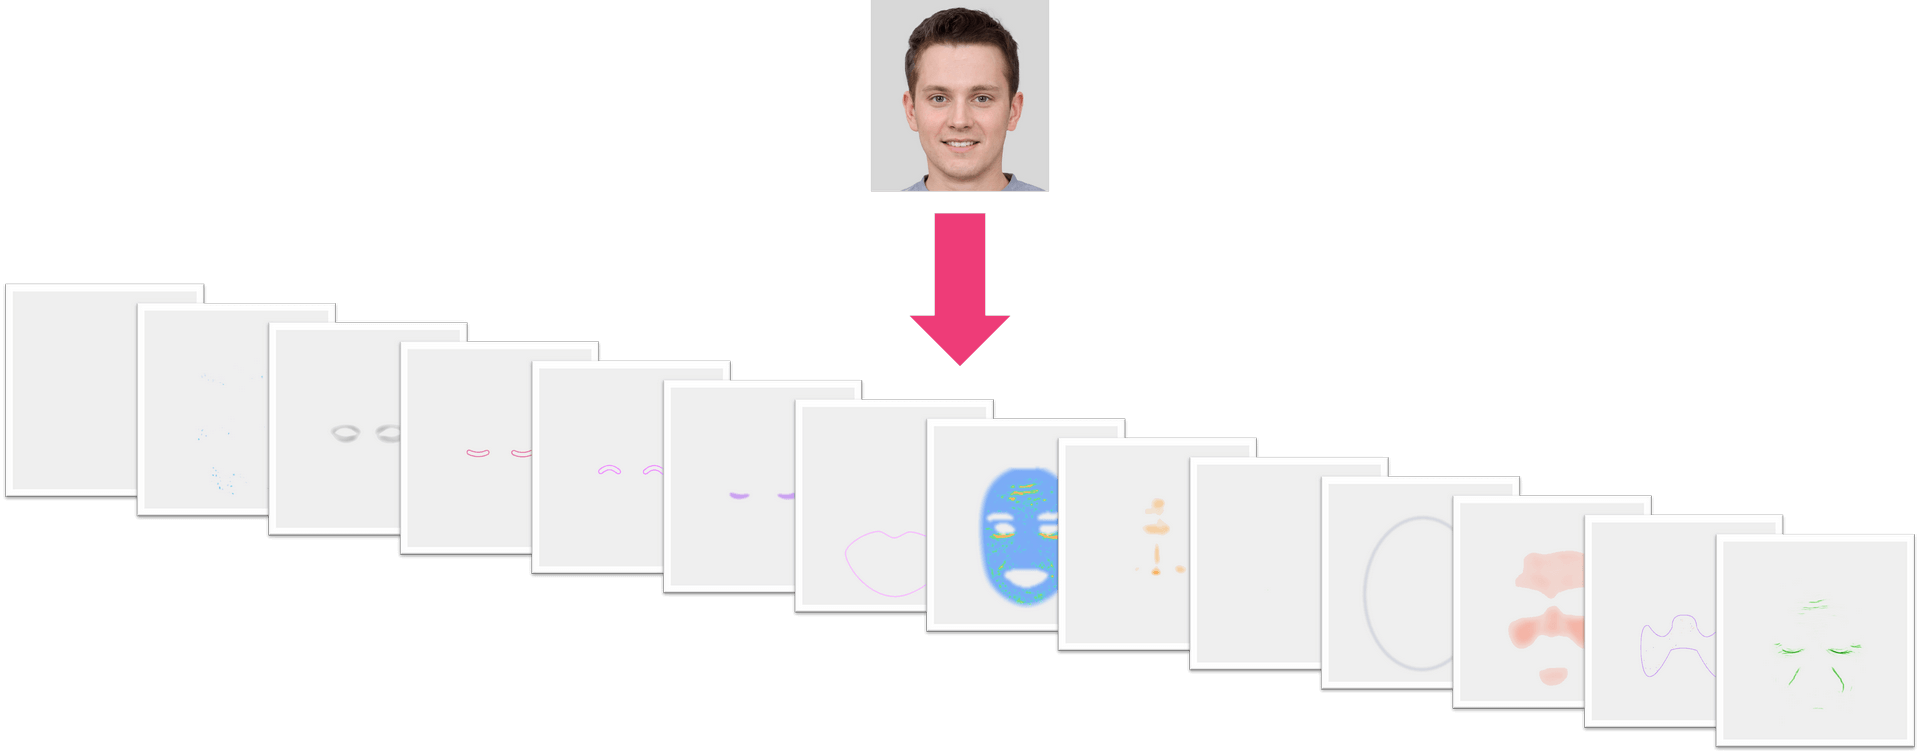
Set enable_mask_overlay to true
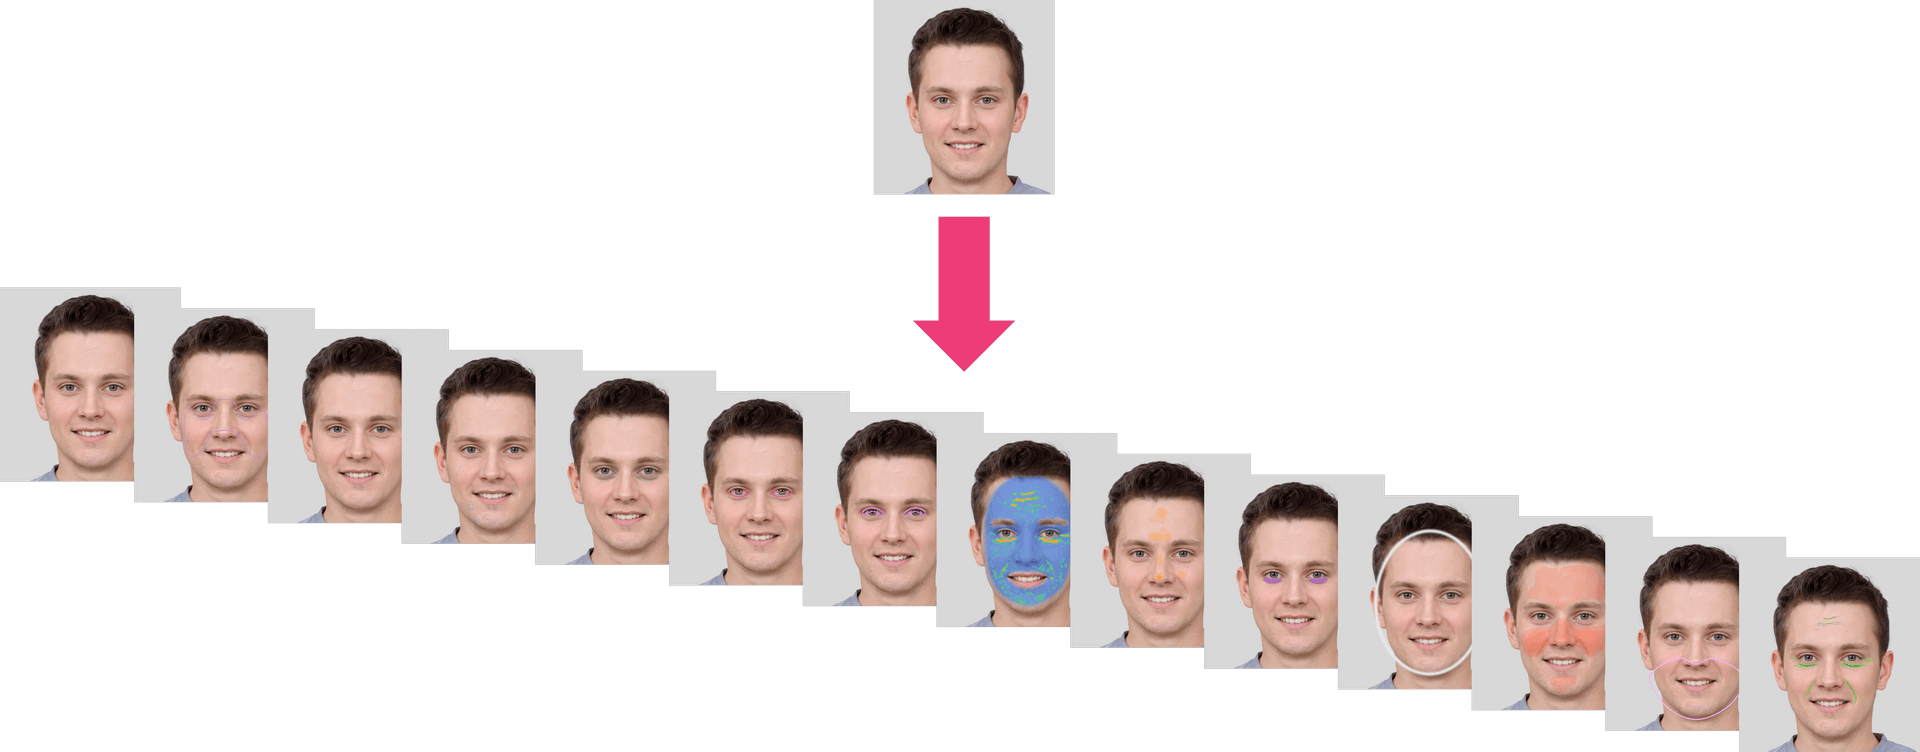
- Output ZIP Data Structure Description The system provides a ZIP file with a 'skinanalysisResult' folder inside. This folder contains a 'score_info.json' file that includes all the detection scores and references to the result images.
The 'score_info.json' file contains all the skin analysis detection results, with numerical scores and the names of the corresponding output mask files.
The PNG files are detection result masks that can be overlaid on your original image. Simply use the alpha values in these PNG files to blend them with your original image, allowing you to see the detection results directly on the source image.
File Structure in the Skin Analysis Result ZIP
HD Skincare ZIP
- skinanalysisResult
- score_info.json
- hd_acne_output.png
- hd_age_spot_output.png
- hd_dark_circle_output.png
- hd_droopy_lower_eyelid_output.png
- hd_droopy_upper_eyelid_output.png
- hd_eye_bag_output.png
- hd_firmness_output.png
- hd_moisture_output.png
- hd_oiliness_output.png
- hd_radiance_output.png
- hd_redness_output.png
- hd_texture_output.png
- hd_pore_output_all.png
- hd_pore_output_cheek.png
- hd_pore_output_forehead.png
- hd_pore_output_nose.png
- hd_wrinkle_output_all.png
- hd_wrinkle_output_crowfeet.png
- hd_wrinkle_output_forehead.png
- hd_wrinkle_output_glabellar.png
- hd_wrinkle_output_marionette.png
- hd_wrinkle_output_nasolabial.png
- hd_wrinkle_output_periocular.png
- hd_tear_trough.png
- hd_skin_type.png
- skinanalysisResult
SD Skincare ZIP
- skinanalysisResult
- score_info.json
- acne_output.png
- age_spot_output.png
- dark_circle_v2_output.png
- droopy_lower_eyelid_output.png
- droopy_upper_eyelid_output.png
- eye_bag_output.png
- firmness_output.png
- moisture_output.png
- oiliness_output.png
- pore_output.png
- radiance_output.png
- redness_output.png
- texture_output.png
- wrinkle_output.png
- tear_trough.png
- skin_type.png
- skinanalysisResult
JSON Data Structure (score_info.json)
"all": A floating-point value between 1 and 100 representing the general skin condition. A higher score indicates healthier and more aesthetically pleasing skin condition.
"skin_age": AI-derived skin age relative to the general population distribution across all age groups.
Each category contains:
- "raw_score": A floating-point value ranging from 1 to 100. A higher score indicates healthier and more aesthetically pleasing skin condition.
- "ui_score": An integer ranging from 1 to 100. The UI Score functions primarily as a psychological motivator in beauty assessment. We adjust the raw scores to produce more favorable results, acknowledging that consumers generally prefer positive evaluations regarding their skin health. This calibration serves to instill greater confidence in users while maintaining the underlying beauty psychology framework.
- "output_mask_name": The filename of the corresponding output mask image.
Categories and Descriptions
HD Skincare:
- "hd_redness": Measures skin redness severity.
- "hd_oiliness": Determines skin oiliness level.
- "hd_age_spot": Detects age spots and pigmentation.
- "hd_radiance": Evaluates skin radiance.
- "hd_moisture": Assesses skin hydration levels.
- "hd_dark_circle": Analyzes the presence of dark circles under the eyes.
- "hd_eye_bag": Detects eye bags.
- "hd_droopy_upper_eyelid": Measures upper eyelid drooping severity.
- "hd_droopy_lower_eyelid": Measures lower eyelid drooping severity.
- "hd_firmness": Evaluates skin firmness and elasticity.
- "hd_texture": Subcategories[whole]; Analyzes overall skin texture.
- "hd_acne": Subcategories[whole]; Detects acne presence.
- "hd_pore": Subcategories[forehead, nose, cheek, whole]; Detects and evaluates pores in different facial regions.
- "hd_wrinkle": Subcategories[forehead, glabellar, crowfeet, periocular, nasolabial, marionette, whole]; Measures the severity of wrinkles in various facial areas.
- "hd_tear_trough": Detects tear trough.
- "hd_skin_type": Subcategories[whole, t_zone, u_zone] Evalutate skin type of Normal, Oily, Dry, Combination, Redness, Dry & Redness, Oily & Redness, Combination & Redness.
SD Skincare:
- "wrinkle": General wrinkle analysis.
- "droopy_upper_eyelid": Measures upper eyelid drooping severity.
- "droopy_lower_eyelid": Measures lower eyelid drooping severity.
- "firmness": Evaluates skin firmness and elasticity.
- "acne": Evaluates acne presence.
- "moisture": Measures skin hydration.
- "eye_bag": Detects eye bags.
- "dark_circle_v2": Analyzes dark circles using an alternative method.
- "age_spot": Detects age spots.
- "radiance": Evaluates skin brightness.
- "redness": Measures skin redness.
- "oiliness": Determines skin oiliness.
- "pore": Measures pore visibility.
- "texture": Analyzes overall skin texture.
- "tear_trough": Detects tear trough.
- "skin_type": Subcategories[whole, t_zone, u_zone] Evaluates skin type of Normal, Oily, Dry, Combination, Redness, Dry & Redness, Oily & Redness, Combination & Redness.
Sample score_info.json of HD Skincare
{
    "hd_redness": {
        "raw_score": 72.011962890625,
        "ui_score": 77,
        "output_mask_name": "hd_redness_output.png"
    },
    "hd_oiliness": {
        "raw_score": 60.74365234375,
        "ui_score": 72,
        "output_mask_name": "hd_oiliness_output.png"
    },
    "hd_age_spot": {
        "raw_score": 83.23274230957031,
        "ui_score": 77,
        "output_mask_name": "hd_age_spot_output.png"
    },
    "hd_radiance": {
        "raw_score": 76.57244205474854,
        "ui_score": 79,
        "output_mask_name": "hd_radiance_output.png"
    },
    "hd_moisture": {
        "raw_score": 48.694559931755066,
        "ui_score": 70,
        "output_mask_name": "hd_moisture_output.png"
    },
    "hd_dark_circle": {
        "raw_score": 80.1993191242218,
        "ui_score": 76,
        "output_mask_name": "hd_dark_circle_output.png"
    },
    "hd_eye_bag": {
        "raw_score": 76.67280435562134,
        "ui_score": 79,
        "output_mask_name": "hd_eye_bag_output.png"
    },
    "hd_droopy_upper_eyelid": {
        "raw_score": 79.05348539352417,
        "ui_score": 80,
        "output_mask_name": "hd_droopy_upper_eyelid_output.png"
    },
    "hd_droopy_lower_eyelid": {
        "raw_score": 79.97175455093384,
        "ui_score": 81,
        "output_mask_name": "hd_droopy_lower_eyelid_output.png"
    },
    "hd_firmness": {
        "raw_score": 89.66898322105408,
        "ui_score": 85,
        "output_mask_name": "hd_firmness_output.png"
    },
    "hd_texture": {
        "whole": {
            "raw_score": 66.3921568627451,
            "ui_score": 75,
            "output_mask_name": "hd_texture_output.png"
        }
    },
    "hd_acne": {
        "whole": {
            "raw_score": 59.92677688598633,
            "ui_score": 76,
            "output_mask_name": "hd_acne_output.png"
        }
    },
    "hd_pore": {
        "forehead": {
            "raw_score": 79.59770965576172,
            "ui_score": 80,
            "output_mask_name": "hd_pore_output_forehead.png"
        },
        "nose": {
            "raw_score": 29.139814376831055,
            "ui_score": 58,
            "output_mask_name": "hd_pore_output_nose.png"
        },
        "cheek": {
            "raw_score": 44.11081314086914,
            "ui_score": 65,
            "output_mask_name": "hd_pore_output_cheek.png"
        },
        "whole": {
            "raw_score": 49.23978805541992,
            "ui_score": 67,
            "output_mask_name": "hd_pore_output_all.png"
        }
    },
    "hd_wrinkle": {
        "forehead": {
            "raw_score": 55.96956729888916,
            "ui_score": 67,
            "output_mask_name": "hd_wrinkle_output_forehead.png"
        },
        "glabellar": {
            "raw_score": 76.7251181602478,
            "ui_score": 75,
            "output_mask_name": "hd_wrinkle_output_glabellar.png"
        },
        "crowfeet": {
            "raw_score": 83.4361481666565,
            "ui_score": 78,
            "output_mask_name": "hd_wrinkle_output_crowfeet.png"
        },
        "periocular": {
            "raw_score": 67.88706302642822,
            "ui_score": 72,
            "output_mask_name": "hd_wrinkle_output_periocular.png"
        },
        "nasolabial": {
            "raw_score": 74.03312683105469,
            "ui_score": 74,
            "output_mask_name": "hd_wrinkle_output_nasolabial.png"
        },
        "marionette": {
            "raw_score": 71.94477319717407,
            "ui_score": 73,
            "output_mask_name": "hd_wrinkle_output_marionette.png"
        },
        "whole": {
            "raw_score": 49.64699745178223,
            "ui_score": 65,
            "output_mask_name": "hd_wrinkle_output_all.png"
        }
    },
    "all": {
        "score": 75.75757575757575
    },
    "skin_age": 37
}
Sample score_info.json of SD Skincare
{
    "wrinkle": {
        "raw_score": 36.09360456466675,
        "ui_score": 60,
        "output_mask_name": "wrinkle_output.png"
    },
    "droopy_upper_eyelid": {
        "raw_score": 79.05348539352417,
        "ui_score": 80,
        "output_mask_name": "droopy_upper_eyelid_output.png"
    },
    "droopy_lower_eyelid": {
        "raw_score": 79.97175455093384,
        "ui_score": 81,
        "output_mask_name": "droopy_lower_eyelid_output.png"
    },
    "firmness": {
        "raw_score": 89.66898322105408,
        "ui_score": 85,
        "output_mask_name": "firmness_output.png"
    },
    "acne": {
        "raw_score": 92.29713000000001,
        "ui_score": 88,
        "output_mask_name": "acne_output.png"
    },
    "moisture": {
        "raw_score": 48.694559931755066,
        "ui_score": 70,
        "output_mask_name": "moisture_output.png"
    },
    "eye_bag": {
        "raw_score": 76.67280435562134,
        "ui_score": 79,
        "output_mask_name": "eye_bag_output.png"
    },
    "dark_circle_v2": {
        "raw_score": 80.1993191242218,
        "ui_score": 76,
        "output_mask_name": "dark_circle_v2_output.png"
    },
    "age_spot": {
        "raw_score": 83.23274230957031,
        "ui_score": 77,
        "output_mask_name": "age_spot_output.png"
    },
    "radiance": {
        "raw_score": 76.57244205474854,
        "ui_score": 79,
        "output_mask_name": "radiance_output.png"
    },
    "redness": {
        "raw_score": 72.011962890625,
        "ui_score": 77,
        "output_mask_name": "redness_output.png"
    },
    "oiliness": {
        "raw_score": 60.74365234375,
        "ui_score": 72,
        "output_mask_name": "oiliness_output.png"
    },
    "pore": {
        "raw_score": 88.38014125823975,
        "ui_score": 84,
        "output_mask_name": "pore_output.png"
    },
    "texture": {
        "raw_score": 80.09742498397827,
        "ui_score": 76,
        "output_mask_name": "texture_output.png"
    },
    "all": {
        "score": 75.75757575757575
    },
    "skin_age": 37
}
- Supported Formats & Dimensions
| AI Feature | Supported Dimensions | Supported File Size | Supported Formats |
|---|---|---|---|
| SD Skincare | Minimum short side length must be at least 480 pixels. There is no limit on the long side; however, if it exceeds 2560 pixels, the system will automatically resize it to 2560 pixels. | < 10MB | jpg/jpeg/png |
| HD Skincare | The minimum short side length must be at least 1080 pixels. There is no restriction on the long side; however, if it exceeds 2560 pixels, it will be automatically resized to 2560 pixels. | < 10MB | jpg/jpeg/png |
Warning: Although the API automatically resizes images to a maximum dimension of 2560 pixels, you are responsible for ensuring that all faces are clearly in focus, the image quality is high, lighting is even, and faces are large enough and oriented directly toward the camera. Motion blur and occlusions must be avoided when capturing HD or SD skincare images prior to running AI Skin Analysis. The use of a portrait aspect ratio is strongly recommended over landscape for optimal results.
Suggestions for How to Shoot:

Get Ready to Start Skin Analysis Instructions
Take off your glasses and make sure bangs are not covering your forehead
Make sure that you’re in a well-lit environment
Remove makeup to get more accurate results
Look straight into the camera and keep your face in the center
Photo requirement We will check the image quality to ensure it is suitable for AI Skin Analysis. Please make sure the face occupies approximately 60–80% of the image width, without any overlays or obstructions. The lighting should be bright and evenly distributed, avoiding overexposure or blown-out highlights. The pose should be front-facing, neutral, and relaxed, with the mouth closed and eyes open.
You should fully reveal your forehead and brush your fringe back or tie your hair to ensure the best quality. It is recommended that you remove your spectacles for optimal AI Skin Analysis performance, although this is not mandatory.
Warning: The width of the face needs to be greater than 60% of the width of the image.

- Error Codes
| Error Code | Description |
|---|---|
| error_below_min_image_size | Input image resolution is too small |
| error_exceed_max_image_size | Input image resolution is too large |
| error_src_face_too_small | The face area in the uploaded image is too small. The width of the face needs to be greater than 60% of the width of the image. |
| error_src_face_out_of_bound | The face area in the uploaded image is out of bound |
| error_lighting_dark | The lighting in the uploaded image is too dark |
- Environment & Dependency
| Sample Code Language / Tool | Recommended Runtime Versions |
|---|---|
| cURL | - bash >= 3.2 - curl >= 7.58 (modern TLS/HTTP support) - jq >= 1.6 (robust JSON parsing) |
| Node.js (JavaScript) | Node >= 18 (for global fetch) |
| JavaScript | - Chrome / Edge >= 80 - Firefox >= 74 - Safari >= 13.1 |
| PHP | PHP >= 7.4 (for modern TLS/compat), ext-curl (recommended) or allow_url_fopen=On + ext-openssl, ext-json |
| Python | Python >= 3.10 (for f-strings), requests >= 2.20.0 |
| Java | Java 11+ (for HttpClient), Jackson Databind >= 2.12.0 |
version: v2.5The JavaScript Camera Kit provides a complete in-browser camera solution designed for high-accuracy face-based imaging tasks. It handles camera permissions, real-time face detection, automatic quality validation (lighting, pose, angle, distance), and guided capture UI flows.
This module is optimized for AI-driven image analysis, such as:
- AI Skin Analysis (SD/HD)
- AI Face Tone Analysis
- Hair-related Analysis
- Virtual Try-On (Ring, Wrist, Necklace, etc.)
- Permission Handling: Automatic management of webcam access.
- Quality Validation: Real-time monitoring of face position, lighting, and angle.
- Multi-Step Flows: Support for complex capture requirements (e.g., multi-angle hair capture).
- Flexible Output: Supports both
base64andblobimage formats.
Include the SDK via CDN in your HTML <head> or before the closing <body> tag. Once loaded, the SDK installs a global YMK object.
<script src="https://plugins-media.makeupar.com/v2.5-camera-kit/sdk.js"></script>The following example demonstrates how to initialize the kit, open the camera, and handle captured images.
<!DOCTYPE html>
<html lang="en">
  <head>
    <meta charset="UTF-8" />
    <meta name="viewport" content="width=device-width, initial-scale=1.0" />
    <title>Camera Kit Sample</title>
    <style>
      #YMK-module { margin: 20px 0; }
      img { width: 150px; margin: 5px; border: 1px solid #ccc; }
    </style>
  </head>
  <body>

    <!-- Initialization Script -->
    <script>
      // Define async init entry point
      window.YMKAsyncInit = function() {
        YMK.addEventListener('loaded', function() {
          console.log('Module fully loaded and ready');
        });

        YMK.addEventListener('faceDetectionCaptured', function(capturedResult) {
          const container = document.getElementById('captured-results');
          container.innerHTML = '';

          // Handle multiple images if returned (e.g., multi-angle capture)
          for (const item of capturedResult.images) {
            const img = document.createElement('img');
            // Handle both base64 strings and Blob objects
            img.src = typeof item.image === 'string'
              ? item.image
              : URL.createObjectURL(item.image);
            container.appendChild(img);
          }
        });
      };

      function openCameraKit() {
        YMK.init({
          faceDetectionMode: 'makeup',
          imageFormat: 'base64',
          language: 'enu'
        });
        YMK.openCameraKit();
      }
    </script>

    <!-- Load SDK -->
    <script src="https://plugins-media.makeupar.com/v2.5-camera-kit/sdk.js"></script>

    <!-- UI Elements -->
    <button onclick="openCameraKit()">Open Camera Kit</button>

    <!-- Mandatory Mount Point -->
    <div id="YMK-module"></div>

    <h3>Captured Results:</h3>
    <div id="captured-results"></div>
  </body>
</html>To ensure successful integration, the following requirements must be met:
| Requirement | Description |
|---|---|
| Browser Support | Must support getUserMedia API. |
| HTTPS | Required on most browsers for webcam access (except localhost). |
| Mount Point | A <div id="YMK-module"></div> is mandatory for rendering the UI. |
| Async Init | You must define window.YMKAsyncInit before the SDK loads. |
Call YMK.init() before calling YMK.openCameraKit().
YMK.init({
  faceDetectionMode: 'makeup', // Detection flow
  imageFormat: 'base64',       // Output format
  language: 'enu'              // UI Language
});Register listeners for camera events and capture results.
YMK.addEventListener('faceQualityChanged', function(q) {
  console.log('Quality updated:', q);
});This displays the UI, opens the webcam, and begins real-time monitoring.
YMK.openCameraKit();Images arrive via the faceDetectionCaptured event.
YMK.addEventListener('faceDetectionCaptured', function(result) {
  console.log(result.images);
});Clean up resources when done.
YMK.close();Configures module appearance, detection mode, language, and capture format.
| Argument | Type | Description | Default |
|---|---|---|---|
faceDetectionMode | string | Detection flow to use (see Detection Modes below). | "skincare" |
width | number | Pixel width of module container (300–1920). | 360 (≥500px) or screen width |
height | number | Pixel height of module container (300–1920). | 480 (≥500px) or min(screen.height, innerHeight) |
language | string | UI Language code (chs, cht, deu, enu, esp, fra, jpn, kor, ptb, ita, mon ). | "enu" |
imageFormat | string | Format returned via faceDetectionCaptured. | "base64" |
disableCameraResolutionCheck | boolean | Allow running even if webcam does not meet required resolution. | false |
hideFlipCameraButton | boolean | Controls visibility of the flip front/back camera button if the device supports it. | false |
countingDuration | number | Controls the countdown milliseconds when camera quality check meets criteria before auto-capture. | 800 |
qualityLevel | string | Controls the camera quality check setting, with options of relaxed, moderate, or strict. | relaxed |
qualityOverrides | object | Configure detailed parameters for camera quality verification. | See Camera Kit Quality Configuration |
videoQuality | string | Configure the output quality to 720p, 1080p, or 1920p. 720p corresponds to 1280 × 720, 1080p to 1920 × 1080, and 1920p to 2560 × 1920. This setting is supported only for skincare and hdskincare | 720p |
| Method | Description |
|---|---|
YMK.openCameraKit() | Opens the module and begins detection. |
YMK.close() | Closes module and camera. |
YMK.addEventListener(event, callback) | Registers event callbacks. Returns an EventListenerIdentifier. |
YMK.removeEventListener(id) | Removes listener by identifier. |
YMK.isLoaded() | Returns whether livestream or photo is drawn on canvas (boolean). |
YMK.pause() | Pauses the webcam stream. |
YMK.resume(restartWebcam) | Resumes webcam after pause. |
YMK.getInfo() | Returns current module info (e.g., { fps: 30 }). |
Camera Kit provides configurable quality parameters to control face detection and skin analysis behavior. These parameters allow developers to fine-tune detection strictness while maintaining consistency across web and native SDK implementations.
To simplify configuration, Camera Kit includes three predefined presets:
- RELAXED: Optimized for usability with minimal restrictions
- MODERATE: Balanced between usability and accuracy
- STRICT: Optimized for maximum detection accuracy
All custom configurations must meet or exceed the minimum requirements defined by the RELAXED preset.
Camera Kit Quality Configuration supports both skincare and hdskincare.
| Preset | Description |
|---|---|
| RELAXED | Less strict validation for smoother user experience |
| MODERATE | Balanced validation for most use cases |
| STRICT | Tight validation for high accuracy scenarios |
When using qualityOverrides, you may specify only the parameters you want to change. Unspecified parameters fall back to the active preset defaults.
{
  "face_ratio_lower_threshold": 0.55,
  "face_ratio_upper_threshold": 1,
  "face_left_boundary_lower_threshold": 0,
  "face_left_boundary_upper_threshold": 1,
  "face_right_boundary_lower_threshold": 0,
  "face_right_boundary_upper_threshold": 1,
  "face_top_boundary_lower_threshold": 0,
  "face_top_boundary_upper_threshold": 1,
  "face_bottom_boundary_lower_threshold": 0,
  "face_bottom_boundary_upper_threshold": 1,
  "pitch_lower_threshold": -20,
  "pitch_upper_threshold": 10,
  "yaw_lower_threshold": -15,
  "yaw_upper_threshold": 15,
  "roll_lower_threshold": -15,
  "roll_upper_threshold": 15,
  "lighting_lower_threshold": 0.55,
  "lighting_upper_threshold": 0.8,
  "lighting_uneven_threshold": 0.2
}Controls the acceptable proportion of the detected face.
- Measurement basis:
- Landscape mode: vertical ratio
- Portrait mode: horizontal ratio
| Parameter | Description | Allowed Range | Preset Defaults |
|---|---|---|---|
face_ratio_lower_threshold | Minimum face ratio | 0.55 to 1.0 | STRICT 0.75, MODERATE 0.65, RELAXED 0.55 |
face_ratio_upper_threshold | Maximum face ratio | 1.0 | 1.0 (all presets) |
Defines how close the face can be to the frame edges.
| Parameter | Description | Allowed Range | Default |
|---|---|---|---|
face_left_boundary_lower_threshold | Left boundary minimum | 0.0 to 1.0 | 0.0 |
face_left_boundary_upper_threshold | Left boundary maximum | 0.0 to 1.0 | 1.0 |
face_right_boundary_lower_threshold | Right boundary minimum | 0.0 to 1.0 | 0.0 |
face_right_boundary_upper_threshold | Right boundary maximum | 0.0 to 1.0 | 1.0 |
face_top_boundary_lower_threshold | Top boundary minimum | 0.0 to 1.0 | 0.0 |
face_top_boundary_upper_threshold | Top boundary maximum | 0.0 to 1.0 | 1.0 |
face_bottom_boundary_lower_threshold | Bottom boundary minimum | 0.0 to 1.0 | 0.0 |
face_bottom_boundary_upper_threshold | Bottom boundary maximum | 0.0 to 1.0 | 1.0 |
Controls allowable head orientation.
| Parameter | Description | Allowed Range | Preset Defaults |
|---|---|---|---|
pitch_lower_threshold | Minimum pitch angle | -20 to 10 | STRICT -10, MODERATE -15, RELAXED -20 |
pitch_upper_threshold | Maximum pitch angle | -20 to 10 | STRICT 0, MODERATE 5, RELAXED 10 |
yaw_lower_threshold | Minimum yaw angle | -15 to 15 | STRICT -5, MODERATE -10, RELAXED -15 |
yaw_upper_threshold | Maximum yaw angle | -15 to 15 | STRICT 5, MODERATE 10, RELAXED 15 |
roll_lower_threshold | Minimum roll angle | -15 to 15 | STRICT -5, MODERATE -10, RELAXED -15 |
roll_upper_threshold | Maximum roll angle | -15 to 15 | STRICT 5, MODERATE 10, RELAXED 15 |
Defines acceptable lighting quality and uniformity.
| Parameter | Description | Allowed Range | Preset Defaults |
|---|---|---|---|
lighting_lower_threshold | Minimum lighting level | 0.55 to 1.0 | STRICT 0.8, MODERATE 0.7, RELAXED 0.55 |
lighting_upper_threshold | Maximum lighting level | 0.8 to 1.0 | STRICT 0.9, MODERATE 0.85, RELAXED 0.8 |
lighting_uneven_threshold | Maximum luma difference between eyes | 0.0 to 0.2 | STRICT 0.1, MODERATE 0.15, RELAXED 0.2 |
- Custom values must not be less restrictive than RELAXED preset values.
- Only specified fields in
qualityOverridesare applied. - All unspecified parameters default to the selected preset.
Configure the faceDetectionMode in YMK.init() to suit your specific use case.
| Mode | Description |
|---|---|
makeup | Standard camera mode for virtual cosmetic try-on. |
skincare | Standard skin analysis mode, close-up face capture. Support AI Skin Analysis and AI Skin Simulation. |
hdskincare | High-definition capture for AI skin analysis using webcams with a minimum resolution of 2560 pixels on the longer side, subject to device support. |
shadefinder | Skin Tone Analysis front-face capture. |
facereshape | AI Face Reshape capture and AI Face Lift. |
hairlength | Full hair-length capture (from a distance). |
hairfrizziness | 3-phase capture: front, right-turn, left-turn. |
hairtype | Same 3-phase multi-angle capture flow. |
hairdensity | A 45‑degree downward head‑angle photograph. |
ring | Hand capture for ring virtual try‑on. |
wrist | Wrist capture for watch or bracelet virtual try‑on. |
necklace | Selfie capture for necklace try-on. |
earring | Selfie capture for earring virtual try-on. |
teethwhiten | Front‑facing selfie that detects whether teeth are visible; photo taken only when detected. |
nail | Hand capture for nails virtual try‑on. |
comprehensive | Photo to be used simultaneously for AI Makeup, AI Skin Analysis, and AI Facial Attributes & Ratio Analysis. |
| Event | Description |
|---|---|
opened | Module opened. |
loading | Loading progress (0–100). |
loaded | Camera stream loaded onto canvas. |
closed | Module closed. |
faceDetectionStarted | User enters the detection UI. |
| Event | Description |
|---|---|
cameraOpened | Webcam opened successfully. |
cameraClosed | Webcam closed. |
cameraFailed | Permission denied or no webcam found. Error codes include "error_resolution_unsupported", "error_permission_denied", "error_access_failed". |
unsupportedResolution | Fired when the device resolution does not meet the minimum requirements for the selected mode. |
Fires continuously during detection as quality metrics update.
Example Payload:
{
  "hasFace": true,
  "position": "good",
  "frontal": "good",
  "lighting": "ok"
}
Field Definitions:
hasFace: (boolean) Whether a face is detected.position: (string) Face distance/size quality ("good","notgood","toosmall","outofboundary").frontal: (string) Whether user is facing forward ("good","notgood").lighting: (string) Lighting strength ("good","ok","notgood").
Fired after all required face quality validation checks have passed and the Camera Kit has successfully completed the capture workflow. Depending on the mode, this may contain one or multiple images.
Example Payload:
{
  "mode": "makeup",
  "images": [
    {
      "phase": 0,
      "image": "data:image/jpeg;base64,...",
      "width": 500,
      "height": 500
    }
  ]
}
Image Object Fields:
phase: (integer) Zero-based index representing the capture step.image: (string|Blob) The captured image data.width: (integer) Pixel width of the captured image.height: (integer) Pixel height of the captured image.
To ensure successful capture:
- Distance: Ensure correct face distance (not too zoomed in/out).
- Angle: Ensure frontal face angle.
- Lighting: Provide sufficient lighting (avoid shadows or dark environments).
Modes like hairtype or hairfrizziness require multiple steps:
- Front face
- Turn right
- Turn left
Ensure your event handling logic accounts for multiple images in the faceDetectionCaptured result array.
- Flip Button: Use
hideFlipCameraButton: trueto enforce a specific camera orientation if your UX requires it. - Capture Delay: Adjust
countingDuration(default800) to give users more time to review the capture before auto-submission occurs.
const minQuality = {
  hasFace: true,
  area: "good",
  frontal: "good",
  lighting: "ok"
};
Mobile CameraKit-v2.5.0: https://us-consultation-cdn.perfectcorp.com/ttlx/8296658a-d9dd-45ce-ad4d-7cee3d03de45.zip
Perfect Corp.'s Mobile CameraKit provides real-time camera frame quality checking for AI Skin Analysis API. The SDK evaluates lighting conditions, face area visibility, and head pose alignment to ensure optimal input quality for YouCam API services including:
- AI Skin Analysis
| Component | Version | Release Date |
|---|---|---|
| CameraKit SDK | 2.5.0 | Apr. 16, 2026 |
| Feature | Description |
|---|---|
| Real-time Quality Check | Continuous frame-by-frame quality assessment |
| Preset Levels | STRICT, MODERATE, RELAXED configurations |
| Custom Overrides | Fine-tune individual parameters per use case |
| Cross-Platform | Unified API for Android and iOS |
| External Camera Support | Works with custom camera implementations |
| Requirement | Minimum | Recommended |
|---|---|---|
| OS Version | Android 6.0 (API Level 23) | Android 9.0+ |
| CPU | Snapdragon 6xx series | Snapdragon 8xx series |
| RAM | 3.0 GB | 4.0 GB |
| Camera Access | Required | Required |
| Requirement | Minimum | Recommended |
|---|---|---|
| OS Version | iOS 12.0 | iOS 15.0+ |
| Device | iPhone 6 / iPad Air | iPhone 8+ / iPad Pro |
| Camera Access | Required | Required |
| Xcode Version | Xcode 14+ | Latest Stable |
// Root build.gradle
allprojects {
    repositories {
        flatDir {
            dirs 'libs'
        }
    }
}

// Module build.gradle
dependencies {
    implementation(name: 'PerfectLibCameraKit', ext: 'aar')
}<!-- AndroidManifest.xml -->
<uses-permission android:name="android.permission.CAMERA"/>
<uses-feature android:name="android.hardware.camera" android:required="false"/>Place model files in app/src/main/assets/model/ or use external storage path.
- Drag
PerfectLibCameraKit.frameworkto Frameworks, Libraries, and Embedded Content - Select "Do Not Embed" (static framework)
-ObjC -lc++ -framework CoreMotion<!-- Info.plist -->
<key>NSCameraUsageDescription</key>
<string>We need camera access for AI analysis features</string>Drag model folder into project with "Copy items if needed" selected.
// 1. Initialize PerfectLib SDK first
Configuration configuration = Configuration.builder()
    .setModelPath(PerfectLib.ModelPath.assets("model"))
    .build();

PerfectLib.init(getApplicationContext(), configuration, new PerfectLib.InitialCallback() {
    @Override
    public void onInitialized(Set<Functionality> availableFunctionalities,
                              Map<String, Throwable> preloadErrors) {
        // 2. Create CameraKit instance
        CameraKit.create(new CameraKit.CreateCallback() {
            @Override
            public void onSuccess(CameraKit cameraKit) {
                CameraKitActivity.this.cameraKit = cameraKit;

                // 3. Set quality check callback
                cameraKit.setCameraKitQualityCheckCallback(result -> {
                    boolean isReady = result.getFaceAreaQuality().isOk()
                        && result.getFacePoseQuality().isOk()
                        && result.getLightingQuality().isOk();

                    if (isReady) {
                        enableCaptureButton();
                    } else {
                        disableCaptureButton();
                    }
                });

                // 4. Set initial quality level
                cameraKit.setCameraKitLevel(CameraKitLevel.RELAXED);
            }

            @Override
            public void onFailure(Throwable throwable) {
                Log.e(TAG, "CameraKit create failed", throwable);
            }
        });
    }

    @Override
    public void onFailure(Throwable throwable, Map<String, Throwable> preloadErrors) {
        Log.e(TAG, "PerfectLib init failed", throwable);
    }
});

// 5. Notify CameraKit when camera opens (in your camera implementation)
cameraKit.onCameraOpened(isFrontCamera, cameraOrientation, previewWidth, previewHeight);

// 6. Send each preview frame to CameraKit
CameraFrame frame = new CameraFrame(data, previewWidth, previewHeight, isFirstFrame);
frame.setFrameOrientation(frameRotationDegrees);
cameraKit.sendCameraBuffer(frame);// 1. Create CameraKit instance with model path
let modelPath = Bundle.main.path(forResource: "model", ofType: "")
CameraKit.create(withModelPath: modelPath) { [weak self] cameraKit, error in
guard let self = self, let cameraKit = cameraKit else { return }
self.cameraKit = cameraKit
// 2. Set delegate for quality check callbacks
self.cameraKit?.delegate = self
// 3. Notify CameraKit when camera opens
self.cameraKit?.onCameraOpen(true) // true = front camera
// 4. Set initial quality level
self.cameraKit?.setCameraKitLevel(.relaxed)
}
// 5. Send each preview frame to CameraKit (AVCaptureVideoDataOutputSampleBufferDelegate)
func captureOutput(_ output: AVCaptureOutput,
didOutput sampleBuffer: CMSampleBuffer,
from connection: AVCaptureConnection) {
cameraKit?.sendCameraBuffer(sampleBuffer)
}
// 6. Implement delegate callback for quality results
extension CameraKitViewController: CameraKitDelegate {
func cameraKit(_ cameraKit: CameraKit, checkedResult: CameraKitQualityCheck) {
let canCapture = checkedResult.lightingQuality.isOk &&
checkedResult.faceAreaQuality.isOk &&
checkedResult.facePoseQuality.isOk
DispatchQueue.main.async { [weak self] in
self?.updateCaptureButtonAvailability()
self?.latestQualityCheck = checkedResult
}
}
}| Parameter | Type | Range | Description |
|---|---|---|---|
| Lighting Quality | Float (0.0-1.0) | 0.55 - 1.0 | Ambient lighting assessment |
| Face Area Quality | Ratio | 0.55 - 1.0 | Face size relative to frame |
| Face Pose Quality | Degrees | ±15° max | Head orientation alignment |
| Face Pose Degree | Float | -180° to +180° | Current measured yaw angle |
// Android
CameraKitQualityCheck.LightingQuality lighting = qualityCheck.getLightingQuality();
boolean isGood = lighting.isOk(); // true if within acceptable range
// iOS
let lighting = checkedResult.lightingQuality
let isGood = lighting.isOk| Status | Description | Action Required |
|---|---|---|
| GOOD | Optimal lighting | ✅ Proceed with capture |
| NORMAL | Acceptable lighting | ✅ Proceed with capture |
| OVER_EXPOSED | Too bright | ⚠️ Reduce brightness |
| UNDER_EXPOSED | Too dark | ⚠️ Increase brightness |
| BACKLIGHTING | Light behind subject | ⚠️ Reposition subject |
| UNEVEN | Inconsistent lighting | ⚠️ Adjust environment |
// Android
CameraKitQualityCheck.FaceAreaQuality faceArea = qualityCheck.getFaceAreaQuality();
boolean isGood = faceArea.isOk();
// iOS
let faceArea = checkedResult.faceAreaQuality
let isGood = faceArea.isOk| Status | Description | Action Required |
|---|---|---|
| GOOD | Face properly sized | ✅ Proceed with capture |
| TOO_SMALL | Face too far away | ⚠️ Move closer to camera |
| OUT_OF_BOUNDARY | Face too close/cut off | ⚠️ Move back from camera |
// Android
CameraKitQualityCheck.FacePoseQuality facePose = qualityCheck.getFacePoseQuality();
boolean isGood = facePose.isOk();
float yawAngle = qualityCheck.getFacePoseDegree(); // Current yaw in degrees
// iOS
let facePose = checkedResult.facePoseQuality
let isGood = facePose.isOk| Status | Description | Action Required |
|---|---|---|
| GOOD | Face properly aligned | ✅ Proceed with capture |
| BAD | Head turned too far | ⚠️ Look straight at camera |
| Level | Use Case | Quality vs UX Balance |
|---|---|---|
| STRICT | High-accuracy analysis | Maximum quality, stricter requirements |
| MODERATE | General use | Balanced quality and user experience |
| RELAXED | Virtual try-on | More lenient, better UX |
| Parameter | STRICT | MODERATE | RELAXED |
|---|---|---|---|
| Face Size Ratio | ≥ 0.75 | ≥ 0.65 | ≥ 0.55 |
| Face Yaw (max) | ±5.0° | ±10.0° | ±15.0° |
| Pitch Upper | ≤ 0.0° | ≤ +5.0° | ≤ +10.0° |
| Pitch Lower | ≥ -10.0° | ≥ -15.0° | ≥ -20.0° |
| Lighting Lower | ≥ 0.80 | ≥ 0.70 | ≥ 0.55 |
| Lighting Upper | ≤ 0.90 | ≤ 0.85 | ≤ 0.80 |
// Set preset level (resets all parameters to defaults)
cameraKit.setCameraKitLevel(CameraKitLevel.STRICT);
cameraKit.setCameraKitLevel(CameraKitLevel.MODERATE);
cameraKit.setCameraKitLevel(CameraKitLevel.RELAXED);

// Get current parameter for inspection
CameraKitParameter currentParam = cameraKit.getCurrentParameter();
float faceSizeRatio = currentParam.getFaceSizeRatio();
float lightingLower = currentParam.getLightingLower();// Set preset level (resets all parameters to defaults)
cameraKit?.setCameraKitLevel(.strict)
cameraKit?.setCameraKitLevel(.moderate)
cameraKit?.setCameraKitLevel(.relaxed)
// Get current parameter for inspection
if let currentParam = cameraKit?.currentParameter {
let faceSizeRatio = currentParam.faceSizeRatio
let lightingLower = currentParam.lightingLower
}- Set Base Level - Establish baseline thresholds using
setCameraKitLevel() - Override Specific Values - Use builder pattern to customize selected parameters
⚠️ Important:
setCameraKitLevel()resets all values to preset defaults.setCameraKitOverwrite()preserves current level and only applies specified changes.
// 1. Set base level first
cameraKit.setCameraKitLevel(CameraKitLevel.MODERATE);

// 2. Get current parameter and create builder
CameraKitParameterBuilder parameterBuilder = cameraKit
    .getCurrentParameter()
    .getParameterBuilder();

// 3. Override specific parameters (only set what you want to change)
parameterBuilder.setFaceYaw(12.0f);           // Allow more head rotation
parameterBuilder.setLightingLower(0.60f);     // Accept lower lighting
parameterBuilder.setFaceSizeRatio(0.60f);     // Smaller face acceptable

// 4. Build and apply override
CameraKitParameter customParam = parameterBuilder.build();
cameraKit.setCameraKitOverwrite(customParam);

// 5. Verify current settings
CameraKitParameter current = cameraKit.getCurrentParameter();
Log.d(TAG, "Face Yaw: " + current.getFaceYaw());// 1. Set base level first
cameraKit?.setCameraKitLevel(.moderate)
// 2. Get current parameter and create builder
if let currentParam = cameraKit?.currentParameter {
let builder = currentParam.parameterBuilder
// 3. Override specific parameters (chainable methods)
builder
.setFaceYaw(12.0) // Allow more head rotation
.setLightingLower(0.60) // Accept lower lighting
.setFaceSizeRatio(0.60) // Smaller face acceptable
// 4. Build and apply override
do {
let customParam = try builder.build()
cameraKit?.setCameraKitOverwrite(customParam)
} catch {
print("Parameter build failed: \(error.localizedDescription)")
}
}
// 5. Verify current settings
if let current = cameraKit?.currentParameter {
print("Face Yaw: \(current.faceYaw)")
}| Parameter | Min Value | Max Value | Default (RELAXED) |
|---|---|---|---|
| Face Size Ratio | 0.55 | 1.0 | 0.55 |
| Face Yaw | 0.0 | 15.0 | 15.0 |
| Face Pitch Upper | -20.0 | 10.0 | 10.0 |
| Face Pitch Lower | -20.0 | 10.0 | -20.0 |
| Lighting Upper | 0.8 | 1.0 | 0.8 |
| Lighting Lower | 0.55 | 1.0 | 0.55 |
public class CameraKitActivity extends AppCompatActivity {
    private CameraKit cameraKit;
    private boolean canCapture = false;

    @Override
    protected void onCreate(Bundle savedInstanceState) {
        super.onCreate(savedInstanceState);

        // 1. Initialize SDK and create CameraKit (see Section 4)
        initializeCameraKit();

        // 2. Set up capture button listener
        Button captureButton = findViewById(R.id.captureButton);
        captureButton.setOnClickListener(v -> captureFrame());
    }

    private void initializeCameraKit() {
        // ... See Section 4 for full initialization code

        cameraKit.setCameraKitQualityCheckCallback(result -> {
            canCapture = result.getFaceAreaQuality().isOk()
                && result.getFacePoseQuality().isOk()
                && result.getLightingQuality().isOk();

            runOnUiThread(() -> updateCaptureButtonState());
        });
    }

    private void captureFrame() {
        if (!canCapture || isCaptureInProgress) return;

        isCaptureInProgress = true;
        // Use your camera implementation to take picture
        instances.cameraHandler.obtainMessage(CameraHandler.TAKE_PICTURE,
            new CaptureCallback()).sendToTarget();
    }

    private void onPictureCaptured(Bitmap bitmap) {
        isCaptureInProgress = false;

        if (bitmap != null) {
            // 3. Display captured image for review
            capturedBitmap = bitmap;
            ((ImageView) findViewById(R.id.capturedImageView)).setImageBitmap(bitmap);
            updateCapturedPreviewVisibility(true);
        }
    }

    private void saveCapturedBitmap() {
        if (capturedBitmap == null) return;

        File destFile = SaveImageUtility.getDefaultDestFile("jpg");
        boolean success = SaveImageUtility.compressBitmap(
            getApplicationContext(), capturedBitmap, destFile);

        Toast.makeText(this,
            success ? "Image saved" : "Save image failed",
            Toast.LENGTH_SHORT).show();
    }

    private void updateCaptureButtonState() {
        Button captureButton = findViewById(R.id.captureButton);
        boolean enabled = canCapture && !isCaptureInProgress;
        captureButton.setEnabled(enabled);
        captureButton.setAlpha(enabled ? 1f : 0.45f);
    }

    @Override
    protected void onDestroy() {
        if (cameraKit != null) {
            cameraKit.onDestroyed();
        }
        super.onDestroy();
    }
}

// CameraFrame callback implementation
private static final class CameraPreviewCallback implements PfCamera.PreviewCallback {
    private final Instances instances;
    private boolean isFirstFrame = true;

    @Override
    public void onPreviewFrame(byte[] data, PfCamera camera) {
        if (data == null) return;

        // 4. Send each frame to CameraKit for quality check
        CameraFrame cameraFrame = new CameraFrame(data, previewWidth, previewHeight, isFirstFrame);
        instances.cameraKit.sendCameraBuffer(cameraFrame);
        isFirstFrame = false;
    }
}class CameraKitViewController: UIViewController {
private var cameraKit: CameraKit?
private var latestQualityCheck: CameraKitQualityCheck?
private var isCaptureInProgress = false
override func viewDidLoad() {
super.viewDidLoad()
// 1. Initialize SDK and create CameraKit (see Section 4)
initializeCameraKit()
// 2. Set up capture button listener
captureButton.addTarget(self, action: #selector(actionCapture(_:)), for: .touchUpInside)
}
private func initializeCameraKit() {
let modelPath = Bundle.main.path(forResource: "model", ofType: "")
CameraKit.create(withModelPath: modelPath) { [weak self] cameraKit, error in
guard let self = self, let cameraKit = cameraKit else { return }
self.cameraKit = cameraKit
self.cameraKit?.delegate = self
// 3. Notify when camera opens (after AVCaptureSession setup)
DispatchQueue.global(qos: .background).async { [weak self] in
guard let self = self else { return }
self.session?.startRunning()
self.cameraKit?.onCameraOpen(true)
}
// 4. Set initial quality level
self.cameraKit?.setCameraKitLevel(.moderate)
}
}
@objc private func actionCapture(_ sender: UIButton) {
guard latestQualityCheck?.canCapture() == true,
isCaptureInProgress == false else { return }
capturePhoto()
}
private func capturePhoto() {
guard let photoOutput = photoOutput else { return }
let settings = AVCapturePhotoSettings()
if photoOutput.isHighResolutionCaptureEnabled {
settings.isHighResolutionPhotoEnabled = true
}
isCaptureInProgress = true
updateCaptureButtonAvailability()
photoOutput.capturePhoto(with: settings, delegate: self)
}
private func showCaptureReview(with image: UIImage) {
capturedImage = image
capturedImageView.image = image
// Stop camera preview during review
session?.stopRunning()
captureReviewView.isHidden = false
view.bringSubviewToFront(captureReviewView)
updateCaptureButtonAvailability()
}
private func saveCapturedImage() {
guard let image = capturedImage else { return }
// Request photo library permission and save
PHPhotoLibrary.requestAuthorization(for: .addOnly) { status in
guard status == .authorized || status == .limited else { return }
PHPhotoLibrary.shared().performChanges({
PHAssetChangeRequest.creationRequestForAsset(from: image)
}) { success, error in
DispatchQueue.main.async { [weak self] in
if success {
self?.presentSimpleAlert(title: "Saved", message: "Image saved to Photos")
} else {
self?.presentSimpleAlert(title: "Save Failed", message: error?.localizedDescription ?? "")
}
}
}
}
}
private func updateCaptureButtonAvailability() {
let canCapture = latestQualityCheck?.canCapture() == true &&
isCaptureInProgress == false &&
capturedImage == nil
captureButton.isEnabled = canCapture
captureButton.alpha = canCapture ? 1.0 : 0.5
}
// CameraKitDelegate implementation
extension CameraKitViewController: CameraKitDelegate {
func cameraKit(_ cameraKit: CameraKit, checkedResult: CameraKitQualityCheck) {
DispatchQueue.main.async { [weak self] in
self?.latestQualityCheck = checkedResult
// Update UI indicators
self?.lightingQuality.backgroundColor = checkedResult.lightingQuality.color
self?.faceFrontalQuality.backgroundColor = checkedResult.facePoseQuality.color
self?.faceAreaQuality.backgroundColor = checkedResult.faceAreaQuality.color
self?.updateCaptureButtonAvailability()
}
}
}
// AVCaptureVideoDataOutputSampleBufferDelegate implementation
extension CameraKitViewController: AVCaptureVideoDataOutputSampleBufferDelegate {
func captureOutput(_ output: AVCaptureOutput,
didOutput sampleBuffer: CMSampleBuffer,
from connection: AVCaptureConnection) {
// 5. Send each frame to CameraKit for quality check
cameraKit?.sendCameraBuffer(sampleBuffer)
}
}
// AVCapturePhotoCaptureDelegate implementation
extension CameraKitViewController: AVCapturePhotoCaptureDelegate {
func photoOutput(_ output: AVCapturePhotoOutput,
didFinishProcessingPhoto photo: AVCapturePhoto,
error: Error?) {
guard let imageData = photo.fileDataRepresentation(),
let image = UIImage(data: imageData) else { return }
isCaptureInProgress = false
// Process and show captured image
DispatchQueue.main.async { [weak self] in
self?.showCaptureReview(with: self?.processedCapturedImage(image) ?? image)
}
}
}
deinit {
cameraKit = nil
}
}
// Helper extension for quality check validation
extension CameraKitQualityCheck {
func canCapture() -> Bool {
return lightingQuality.isOk &&
faceAreaQuality.isOk &&
facePoseQuality.isOk
}
}| AI Service | Recommended Level | Information |
|---|---|---|
| AI Skin Analysis | STRICT or MODERATE | Accurate skin concern detection requires a large, front-facing face image captured under consistent, even lighting to ensure clear visibility and reliable analysis. |
// Android
cameraKit.setCameraKitLevel(CameraKitLevel.STRICT);
// Ensures: Face ≥75%, Yaw ±5°, Lighting 0.8-0.9
// iOS
cameraKit?.setCameraKitLevel(.strict)// Android - More lenient for better UX
cameraKit.setCameraKitLevel(CameraKitLevel.RELAXED);
CameraKitParameterBuilder builder = cameraKit.getCurrentParameter().getParameterBuilder();
builder.setFaceYaw(15.0f); // Allow more head movement
builder.setLightingLower(0.55f); // Accept lower lighting
cameraKit.setCameraKitOverwrite(builder.build());// iOS - More lenient for better UX
cameraKit?.setCameraKitLevel(.relaxed)
if let currentParam = cameraKit?.currentParameter {
let builder = currentParam.parameterBuilder
.setFaceYaw(15.0) // Allow more head movement
.setLightingLower(0.55) // Accept lower lighting
do {
let customParam = try builder.build()
cameraKit?.setCameraKitOverwrite(customParam)
} catch {
print("Override failed: \(error)")
}
}| Resource | Link |
|---|---|
| API Reference | Doc-API_References |
| Starting Guide | Android Starting Guide |
| Sample Project | Sample_Code-Camera_Kit |
| AAR Library | PerfectLibCameraKit.aar (Library folder) |
| Model Files | .bin and .mnn files (model folder) |
| Resource | Link |
|---|---|
| API Reference | APIDocuments-iOS |
| Starting Guide | iOS Starting Guide |
| Sample Project | Sample-iOS-CameraKitDemo |
| Framework | PerfectLibCameraKit.framework |
| Model Files | Model folder (drag into project) |
// Core Classes
com.perfectcorp.perfectlib.CameraKit
com.perfectcorp.perfectlib.CameraKit.CreateCallback
com.perfectcorp.perfectlib.CameraKitQualityCheck
com.perfectcorp.perfectlib.CameraKitParameterBuilder
com.perfectcorp.perfectlib.CameraKitLevel
com.perfectcorp.perfectlib.CameraFrame

// Quality Check Enums
CameraKitQualityCheck.FaceAreaQuality
CameraKitQualityCheck.FacePoseQuality
CameraKitQualityCheck.LightingQuality// Core Classes
PFCameraKit
PFCameraKitDelegate
PFCameraKitQualityCheck
PFCameraKitParameterBuilder
PFCameraKitLevel
// Quality Check Enums
PFCameraKitFaceAreaQuality
PFCameraKitFacePoseQuality
PFCameraKitLightingQualityThis section outlines the complete camera lifecycle workflow for integrating Perfect Corp.'s Mobile CameraKit with your custom camera implementation on Android and iOS.
// Before initializing camera, request CAMERA permission
if (ContextCompat.checkSelfPermission(this, Manifest.permission.CAMERA)
    != PackageManager.PERMISSION_GRANTED) {
    ActivityCompat.requestPermissions(this,
        new String[]{Manifest.permission.CAMERA}, REQUEST_CAMERA_PERMISSION);
}| Method | When to Call | Key Parameters |
|---|---|---|
PfCamera.open() | After permission granted | context, library (CAMERA_1/CAMERA_2), facing (FRONT/BACK) |
cameraKit.onCameraOpened() | Immediately after camera opens | isFrontCamera, orientation, previewWidth, previewHeight |
// In CameraHandler.startCamera()
camera = PfCamera.open(context, library, facing);
PfCamera.CameraInfo info = camera.getCameraInfo();

// Notify CameraKit about camera state
cameraKit.onCameraOpened(
    isFrontCamera = (info.facing == FRONT),
    cameraOrientation = info.orientation,
    previewWidth = previewSize.width,
previewHeight = previewSize.height);| Method | Purpose | Recommended Values |
|---|---|---|
tryToSetPreviewAndPictureSize() | Set both sizes simultaneously | 1280x720 (recommended) |
setPreviewCallback() | Receive preview frames for CameraKit | Required for quality check |
// Set preview/picture size before starting preview
camera.tryToSetPreviewAndPictureSize(1280, 720);

PfCamera.Size previewSize = camera.getParameters().getPreviewSize();
previewWidth = previewSize.width;
previewHeight = previewSize.height;

// IMPORTANT: Set preview callback BEFORE startPreview()
camera.setPreviewCallback(new CameraPreviewCallback(instances, camera));| Method | When to Call | Notes |
|---|---|---|
startPreview() | After setting display/texture and callback | Must be called before sending frames |
autoFocus() | After preview starts (optional) | Use CONTINUOUS_PICTURE mode for best results |
// In CameraHandler.startPreview()
camera.startPreview();
isPreviewStarted = true;

// Optional: Auto-focus for better image quality
camera.autoFocus(autoFocusCallback);| Method | Frequency | Thread |
|---|---|---|
sendCameraBuffer() | Every preview frame (30fps recommended) | Background thread from callback |
// In CameraPreviewCallback.onPreviewFrame()
CameraFrame cameraFrame = new CameraFrame(data, previewWidth, previewHeight, isFirstFrame);
cameraFrame.setFrameOrientation(frameRotationDegrees); // Set if needed
cameraKit.sendCameraBuffer(cameraFrame);
isFirstFrame = false;| Method | When to Call | Result |
|---|---|---|
takePicture() | When capture button pressed (quality check passed) | Stops preview temporarily |
onPictureTaken() | In PictureCallback | Returns JPEG byte array |
// In CameraHandler.takePicture()
camera.takePicture(new PfCamera.PictureCallback() {
    @Override
    public void onPictureTaken(byte[] pictureData) {
        // Decode and process captured image
        Bitmap bitmap = decodeCapturedBitmap(pictureData);
        runOnUiThread(() -> onPictureCaptured(bitmap));

        // Preview will be stopped automatically after capture
        isPreviewStarted = false;
    }
});| Method | When to Call | Permission Required |
|---|---|---|
compressBitmap() | After user confirms save | WRITE_EXTERNAL_STORAGE (Android 9-) or MediaStore (Android 10+) |
// In onSaveCapturedButtonClicked()
File destFile = SaveImageUtility.getDefaultDestFile("jpg");
boolean success = SaveImageUtility.compressBitmap(
getApplicationContext(), capturedBitmap, destFile);| Method | When to Call | Cleanup Required |
|---|---|---|
stopPreview() | Before releasing camera | Clear preview callback first |
release() | In onDestroy() or when activity stops | Must be called to free resources |
cameraKit.onDestroyed() | After camera release | Clean up CameraKit instance |
// In CameraHandler.stopCamera()
if (camera != null) {
    camera.stopPreview();
    isPreviewStarted = false;
    camera.setPreviewCallback(null); // Clear callback first
    camera.release();
    camera = null;
}

// In Activity.onDestroy()
@Override
protected void onDestroy() {
    if (cameraKit != null) {
        cameraKit.onDestroyed();
    }
    super.onDestroy();
}┌─────────────────────────────────────────────────────────────┐
│ ANDROID CAMERA LIFECYCLE │
├─────────────────────────────────────────────────────────────┤
│ │
│ [Permission Granted] │
│ ↓ │
│ PfCamera.open() → cameraKit.onCameraOpened() │
│ ↓ │
│ tryToSetPreviewAndPictureSize(1280, 720) │
│ ↓ │
│ setPreviewCallback() ←─── CameraFrame for CameraKit │
│ ↓ │
│ startPreview() + autoFocus() │
│ ↓ │
│ ┌────────────────────────────────────────────┐ │
│ │ Preview Loop (30fps) │ │
│ │ onPreviewFrame → sendCameraBuffer() │ │
│ │ Quality Check Callback → Update UI │ │
│ └────────────────────────────────────────────┘ │
│ ↓ │
│ [Capture Button Pressed] │
│ ↓ │
│ takePicture() → onPictureTaken() │
│ ↓ │
│ Decode Bitmap → Show Review │
│ ↓ │
│ [Save Button Pressed] │
│ ↓ │
│ compressBitmap() → Save to Storage │
│ ↓ │
│ [Activity Destroy/Stop] │
│ ↓ │
│ stopPreview() → release() → cameraKit.onDestroyed() │
│ │
└─────────────────────────────────────────────────────────────┘| Method | When to Call | Info.plist Key |
|---|---|---|
AVCaptureDevice.requestAccess(for:) | Before creating AVCaptureSession | NSCameraUsageDescription |
func requestCameraAuthentication(_ completion: @escaping (_ authorized: Bool)->Void) {
    let status = AVCaptureDevice.authorizationStatus(for: .video)
    if status == .notDetermined {
        AVCaptureDevice.requestAccess(for: .video) { authorized in
            completion(authorized)
        }
    } else {
        completion(status == .authorized)
    }
}| Method | Purpose | Recommended Settings |
|---|---|---|
AVCaptureSession() | Main session object | Preset: .photo or .high |
AVCaptureDeviceInput() | Camera device input | Position: .front or .back |
AVCaptureVideoDataOutput() | Preview frame output | Pixel format: kCVPixelFormatType_420YpCbCr8BiPlanarFullRange |
func _setupCameraAndPreview() {
    guard let input = AVCaptureDevice.default(.builtInWideAngleCamera,
                                               for: .video,
                                               position: currentCameraPosition) else { return }

    let session = AVCaptureSession()
    session.beginConfiguration()

    // Add camera input
    guard let deviceInput = try? AVCaptureDeviceInput(device: input) else { return }
    if session.canAddInput(deviceInput) {
        session.addInput(deviceInput)
        self.videoInput = deviceInput
    }

    // Configure video output for CameraKit frames
    let output = AVCaptureVideoDataOutput()
    output.videoSettings = [kCVPixelBufferPixelFormatTypeKey as String:
                            kCVPixelFormatType_420YpCbCr8BiPlanarFullRange]
    output.alwaysDiscardsLateVideoFrames = false

    // Set delegate on background queue
    let queue = DispatchQueue(label: "com.perfectlib.processsamplebuffer")
    output.setSampleBufferDelegate(self, queue: queue)

    if session.canAddOutput(output) {
        session.addOutput(output)
    }

    // Add photo output for capture
    let photoOutput = AVCapturePhotoOutput()
    if session.canAddOutput(photoOutput) {
        session.addOutput(photoOutput)
        self.photoOutput = photoOutput
        photoOutput.isHighResolutionCaptureEnabled = true
    }

    session.sessionPreset = .photo
    session.commitConfiguration()

    // Start running in background thread
    DispatchQueue.global(qos: .background).async {
        session.startRunning()
    }
}| Method | When to Call | Parameter |
|---|---|---|
onCameraOpen() | After AVCaptureSession starts running | true for front camera, false for back |
// After session.startRunning() completes
self.session = session
cameraKit?.onCameraOpen(currentCameraPosition == .front)| Method | Frequency | Thread |
|---|---|---|
sendCameraBuffer() | Every preview frame (30fps recommended) | Background queue from AVCaptureVideoDataOutputSampleBufferDelegate |
// In AVCaptureVideoDataOutputSampleBufferDelegate.captureOutput()
func captureOutput(_ output: AVCaptureOutput,
                   didOutput sampleBuffer: CMSampleBuffer,
                   from connection: AVCaptureConnection) {
    // Send each frame to CameraKit for quality check
    cameraKit?.sendCameraBuffer(sampleBuffer)
}| Method | When to Call | Result |
|---|---|---|
capturePhoto(with:delegate:) | When capture button pressed (quality check passed) | Returns via AVCapturePhotoCaptureDelegate |
private func capturePhoto() {
    guard let photoOutput = photoOutput else { return }

    let settings = AVCapturePhotoSettings()
    if photoOutput.isHighResolutionCaptureEnabled {
        settings.isHighResolutionPhotoEnabled = true
    }

    // Configure video orientation for correct image rotation
    if let photoConnection = photoOutput.connection(with: .video),
       let orientation = AVCaptureVideoOrientation(deviceOrientation: currentDeviceOrientation()) {
        photoConnection.videoOrientation = orientation
    }

    isCaptureInProgress = true
    updateCaptureButtonAvailability()
    photoOutput.capturePhoto(with: settings, delegate: self)
}

// In AVCapturePhotoCaptureDelegate.photoOutput()
func photoOutput(_ output: AVCapturePhotoOutput,
                didFinishProcessingPhoto photo: AVCapturePhoto,
                error: Error?) {
    guard let imageData = photo.fileDataRepresentation(),
          let image = UIImage(data: imageData) else { return }

    isCaptureInProgress = false

    // Process and show captured image
    DispatchQueue.main.async { [weak self] in
        self?.showCaptureReview(with: self?.processedCapturedImage(image) ?? image)
    }
}| Method | When to Call | Permission Required |
|---|---|---|
PHPhotoLibrary.shared().performChanges() | After user confirms save | NSPhotoLibraryAddUsageDescription (iOS 14+) or NSPhotoLibraryUsageDescription |
private func saveCapturedImage() {
    guard let image = capturedImage else { return }

    // Request photo library permission
    if #available(iOS 14, *) {
        let status = PHPhotoLibrary.authorizationStatus(for: .addOnly)
        switch status {
        case .authorized, .limited:
            saveToPhotos(image)
        case .notDetermined:
            PHPhotoLibrary.requestAuthorization(for: .addOnly) { status in
                if status == .authorized || status == .limited {
                    self.saveToPhotos(image)
                }
            }
        default:
            presentSimpleAlert(title: "Save Failed", message: "Photo library access required")
        }
    } else {
        // iOS 13 and earlier
        let status = PHPhotoLibrary.authorizationStatus()
        switch status {
        case .authorized:
            saveToPhotos(image)
        case .notDetermined:
            PHPhotoLibrary.requestAuthorization { status in
                if status == .authorized {
                    self.saveToPhotos(image)
                }
            }
        default:
            presentSimpleAlert(title: "Save Failed", message: "Photo library access required")
        }
    }
}

private func saveToPhotos(_ image: UIImage) {
    PHPhotoLibrary.shared().performChanges({
        PHAssetChangeRequest.creationRequestForAsset(from: image)
    }) { success, error in
        DispatchQueue.main.async { [weak self] in
            if success {
                self?.presentSimpleAlert(title: "Saved", message: "Image saved to Photos")
            } else {
                self?.presentSimpleAlert(title: "Save Failed", message: error?.localizedDescription ?? "")
            }
        }
    }
}| Method | When to Call | Cleanup Required |
|---|---|---|
session.stopRunning() | Before view disappears or when switching cameras | Stops all inputs/outputs |
cameraKit = nil | In deinit | Releases CameraKit instance |
override func viewWillDisappear(_ animated: Bool) {
    super.viewWillDisappear(animated)

    // Stop camera session
    session?.stopRunning()

    // Remove notification observers
    if let appActiveObserver = appActiveObserver {
        NotificationCenter.default.removeObserver(appActiveObserver)
    }
    if let appInactiveObserver = appInactiveObserver {
        NotificationCenter.default.removeObserver(appInactiveObserver)
    }
}

deinit {
    cameraKit = nil  // Releases CameraKit instance
}| Method | When to Call | Required Actions |
|---|---|---|
rotateCameraPosition() | When flip camera button pressed | Stop session → Remove input → Add new input → Restart → Notify CameraKit |
private func rotateCameraPosition() {
    guard let session = session, let videoInput = videoInput else { return }

    let newPosition: AVCaptureDevice.Position = currentCameraPosition == .front ? .back : .front

    // Create new device input for opposite camera
    guard let input = AVCaptureDevice.default(.builtInWideAngleCamera,
                                               for: .video,
                                               position: newPosition) else { return }
    guard let deviceInput = try? AVCaptureDeviceInput(device: input) else { return }

    session.beginConfiguration()
    session.removeInput(videoInput)

    if session.canAddInput(deviceInput) {
        session.addInput(deviceInput)
        self.videoInput = deviceInput
        self.currentCameraPosition = newPosition

        // IMPORTANT: Notify CameraKit about camera change
        cameraKit?.onCameraOpen(currentCameraPosition == .front)
    } else {
        session.addInput(videoInput)  // Revert if failed
    }

    session.commitConfiguration()
}┌─────────────────────────────────────────────────────────────┐
│ IOS CAMERA LIFECYCLE │
├─────────────────────────────────────────────────────────────┤
│ │
│ [Camera Permission Granted] │
│ ↓ │
│ AVCaptureSession.beginConfiguration() │
│ ↓ │
│ Add Input (AVCaptureDeviceInput) │
│ ↓ │
│ Add Output (AVCaptureVideoDataOutput) ←── sendCameraBuffer()│
│ ↓ │
│ Add Photo Output (AVCapturePhotoOutput) │
│ ↓ │
│ session.startRunning() │
│ ↓ │
│ cameraKit?.onCameraOpen(true/false) │
│ ↓ │
│ ┌────────────────────────────────────────────┐ │
│ │ Preview Loop (AVCaptureVideoDataOutputSampleBufferDelegate) │
│ │ captureOutput → sendCameraBuffer() │ │
│ │ CameraKitDelegate → Update UI │ │
│ └────────────────────────────────────────────┘ │
│ ↓ │
│ [Capture Button Pressed] │
│ ↓ │
│ capturePhoto(with:delegate:) │
│ ↓ │
│ photoOutput(didFinishProcessingPhoto) │
│ ↓ │
│ Show Review → Save to Photos │
│ ↓ │
│ [View Disappear/Deinit] │
│ ↓ │
│ session.stopRunning() → cameraKit = nil │
│ │
└─────────────────────────────────────────────────────────────┘| Stage | Android | iOS | Notes |
|---|---|---|---|
| Permission | requestPermissions() | AVCaptureDevice.requestAccess() | Both require runtime permission |
| Open Camera | PfCamera.open() | AVCaptureSession + AVCaptureDeviceInput | Android uses wrapper, iOS uses AVFoundation |
| Notify CameraKit | onCameraOpened() | onCameraOpen() | Same method name, different signatures |
| Preview Frames | setPreviewCallback() → sendCameraBuffer() | captureOutput() → sendCameraBuffer() | Both send byte/CM buffer to CameraKit |
| Capture Photo | takePicture() + PictureCallback | capturePhoto(with:delegate:) | Android stops preview, iOS continues |
| Save Photo | compressBitmap() + Storage API | PHPhotoLibrary.performChanges() | Platform-specific storage APIs |
| Release Camera | stopPreview() → release() → onDestroyed() | session.stopRunning() → deinit | Both must clean up resources |
- Thread Management: Preview callbacks run on background thread - dispatch UI updates to main thread
- Camera Orientation: Use
setDisplayOrientation()with camera info for correct preview rotation - Focus Mode: Prefer
FOCUS_MODE_CONTINUOUS_PICTUREfor best quality - Memory: Recycle Bitmap objects after use to prevent memory leaks
- Pixel Format: Must use
kCVPixelFormatType_420YpCbCr8BiPlanarFullRangefor CameraKit compatibility - Queue Management: Set sample buffer delegate on background queue to avoid UI blocking
- Orientation Handling: Convert device orientation to AVCaptureVideoOrientation for correct image rotation
- Front Camera Flip: Front camera images need horizontal flip correction after capture
- Quality Check First: Always verify
canCapture()before allowing photo capture - Preview During Review: Stop preview during captured image review, restart on discard
- Error Handling: Gracefully handle permission denial and camera access failures
- Resource Cleanup: Release all resources in appropriate lifecycle callbacks (
onDestroy/deinit)
| Issue | Solution |
|---|---|
| CameraKit not receiving frames | Ensure sendCameraBuffer() is called for each preview frame |
| Quality check always fails | Verify preset level thresholds match your environment |
| Model files not loading | Check assets folder path and file permissions |
| Capture button disabled | All three quality checks must pass (lighting, face area, pose) |
- Frame Rate: Send frames at 30fps for optimal balance between accuracy and performance
- Resolution: Use preview resolution of 1280x720 or higher for best detection accuracy
- Memory Management: Release CameraKit in
onDestroy()(Android) /deinit(iOS) - Thread Safety: Quality check callbacks may be on background thread - dispatch UI updates to main thread
- Request camera permission at runtime before initializing CameraKit
- Handle permission denial gracefully with user-friendly messaging
- Store model files securely within app sandbox
- Comply with platform privacy requirements (Android Privacy Manifest, iOS Privacy Manifest)
For detailed API method signatures, parameter descriptions, and return values, please refer to the official API Reference documentation